FAQs
Do you have questions about using KUPFticket or Kulturspenden.at? Here you’ll find all the knowledge our support team has to offer. If you still have questions, you can contact us at any time using the chat feature in the admin panel!
These FAQs are intended for store owners. If you have questions as a ticket buyer or donor, please contact the relevant organization directly.
Zahlungen & Auszahlungen
Which payment methods are supported?
Customers can pay on KUPFticket with a wide range of common payment methods. The following are currently supported:
- Debit card
- Credit card
- EPS online bank transfer
- Apple Pay
- Google Pay
- Wero
- Link
Organizers do not incur any additional fees, regardless of the payment method chosen.
Please note that the availability of individual payment methods may vary depending on the buyer’s country, device or browser. If the requirements are met, the available payment methods are shown automatically at checkout.
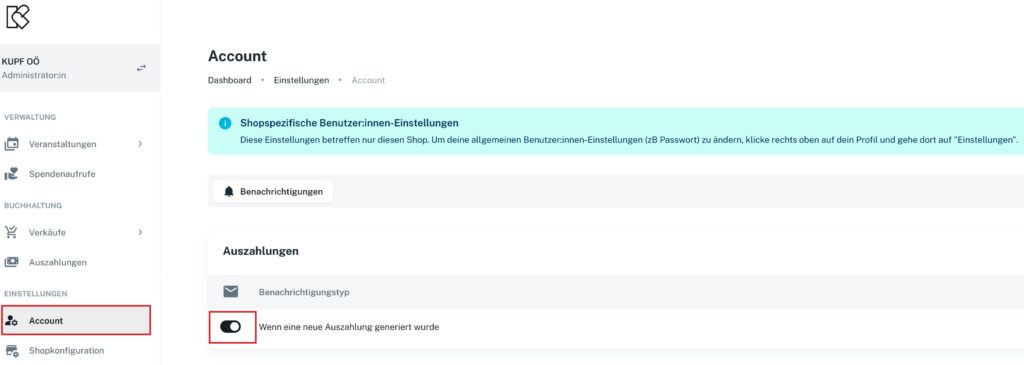
Receive payout confirmations by email
To receive payout confirmations by email, you can enable the notification for your account under “Account”:
Data export: sold tickets & statistics
In the admin area under Events, you can view the sales figures of every event you’ve created in detail:
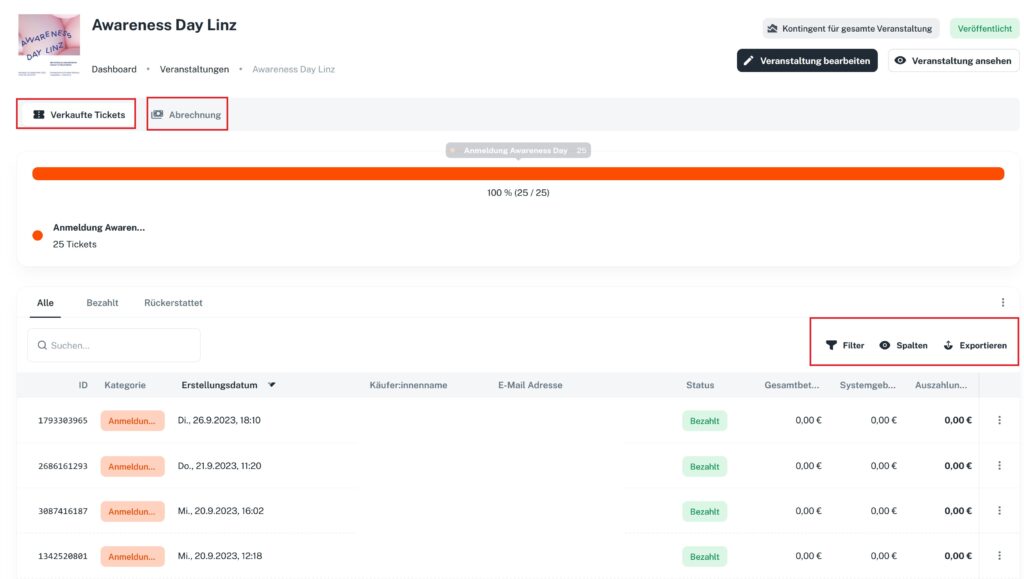
- Under Filter, you can filter the data by various criteria. You can also apply several filters at once.
- Under Columns, you can expand the column view as needed to display key categories.
- Quick buttons:
- All includes paid, canceled and refunded tickets.
- Paid includes only paid tickets – canceled and refunded tickets are not included.
- Refunded includes only refunded tickets – canceled tickets are not included.
- All includes paid, canceled and refunded tickets.
Once you have the data you need, you can download the list via Export either as a PDF document or as a CSV file.
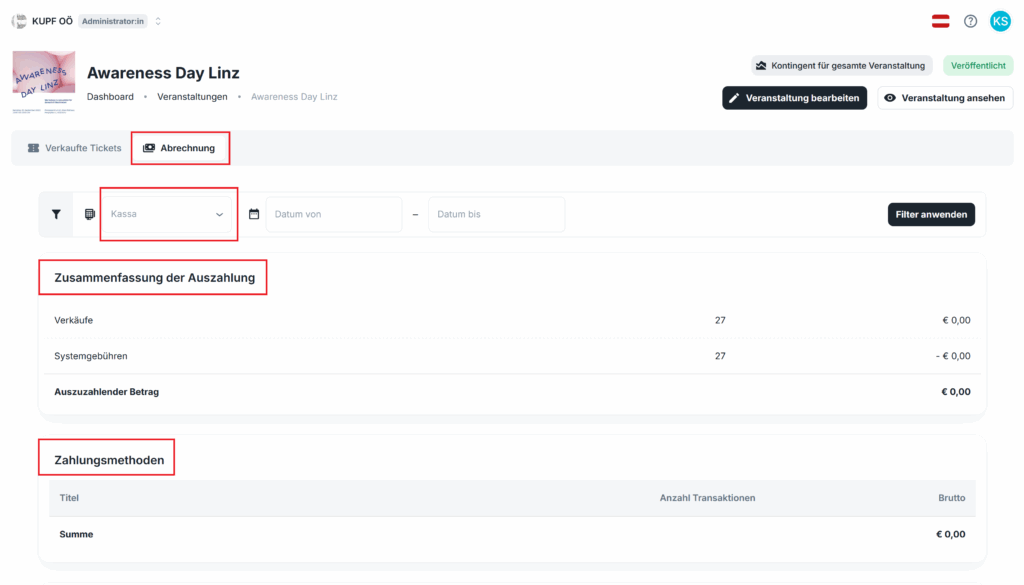
Under Settlement, you’ll find the payout summary and all details on the payment methods used.
Rückerstattung durchführen
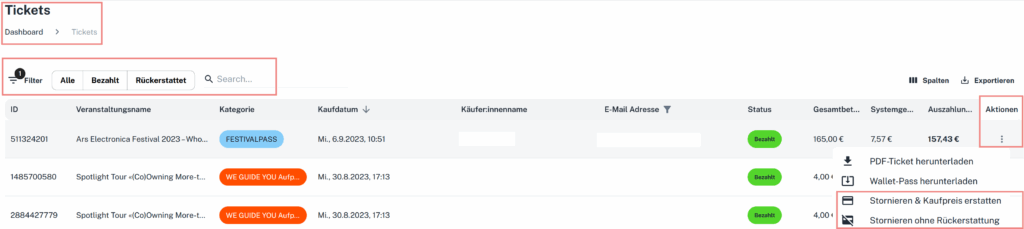
Unter „Tickets“ die richtige Buchung auswählen (unabhängig davon, ob sie online, über die App oder via Kartenterminal bezahlt wurde). In der ganz rechten Spalte auf die drei Punkte klicken und „Stornieren & Rückerstatten“ auswählen.
Auszahlungen
Mit unserem Auszahlungssystem bestimmt ihr, wann und wie ihr eure Ticketerlöse erhält.
Ob gesammelt nach Veranstaltungsende, in regelmäßigen Intervallen oder sofort per Instant Payout – in den Einstellungen unter Shopkonfiguration -> Steuern & Zahlung könnt ihr das Auszahlungsintervall jederzeit frei wählen.
Im Bereich Abrechnungen könnt ihr jederzeit nachsehen, wann die nächste Auszahlung ausgelöst wird. Optional findet ihr hier auch die Möglichkeit Geld sofort auszuzahlen (Instant Payouts). Alle Rechnungen und Auszahlungsbelege werden hier als Download zur Verfügung gestellt.
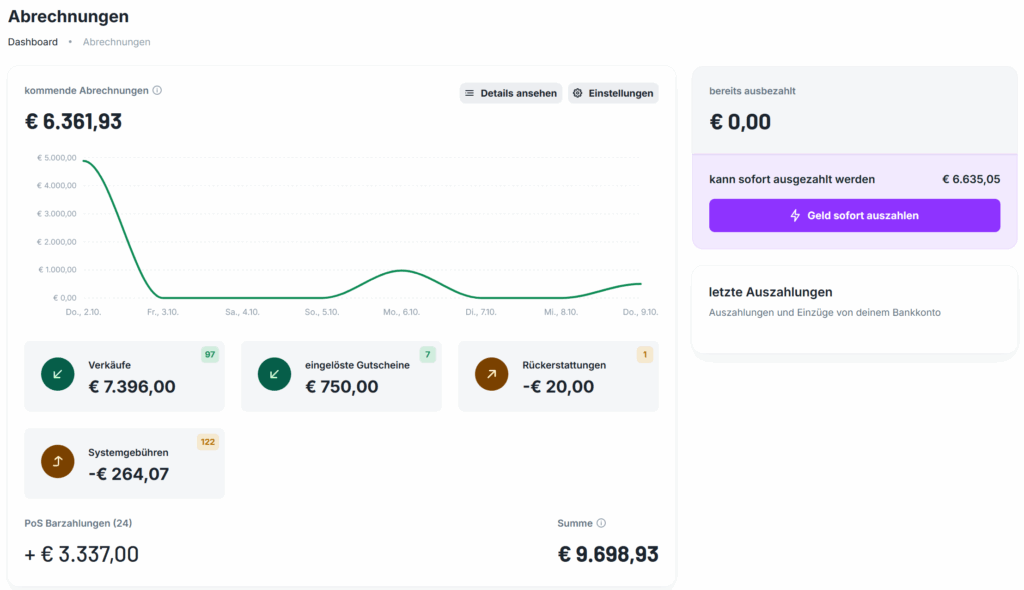
In den Einstellungen könnt ihr jederzeit zwischen unseren zwei Auszahlungsmodellen wählen.
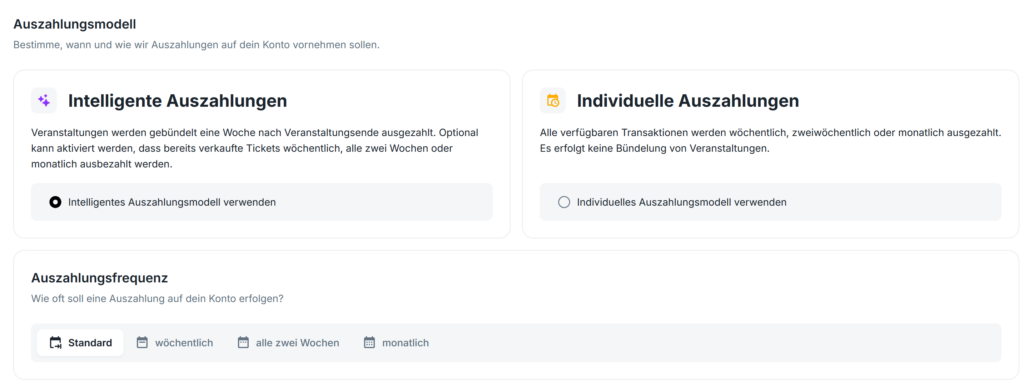
Unsere Auszahlungsmodelle
1) Intelligente Auszahlungen
Standard
Die Erlöse einer Veranstaltung werden in der Regel gesammelt circa 8 Tage nach Ende der Veranstaltung ausgezahlt.
Hinweis: Vorab kann es bereits zu Teilauszahlungen kommen (siehe Ausnahmen*). Der Vorteil: 8 Tage nach Ende der Veranstaltung ist bei dieser Auszahlungsfrequenz die gesamte Veranstaltung abgerechnet und ausgezahlt.
*Ausnahmen
1) Liegen Ticketerlöse bereits 80 Tage auf eurem Stripe-Konto, ist der Zahlungsdienstleister verpflichtet, diese vorab auszuzahlen. Dadurch kann es mehrere Auszahlungen pro Veranstaltung geben.
2) Läuft eine Veranstaltung bereits seit mehr als zwei Wochen und liegt gleichzeitig noch mehr als zwei Wochen in der Zukunft, erfolgt eine wöchentliche Auszahlung. Typisches Beispiel: Museen.
Wöchentlich, alle zwei Wochen oder monatlich
Die Ticketerlöse können pro Veranstaltung auch gebündelt wöchentlich, alle zwei Wochen oder monatlich ausbezahlt werden.
Hinweis: Bei einem dichten Veranstaltungsprogramm führt dieses Modell zu einer hohen Anzahl an Auszahlungen und Abrechnungsbelegen.
2) Individuelle Auszahlungen
Alle verfügbaren Erlöse werden gesammelt und unabhängig von einzelnen Veranstaltungen in einem festen Intervall ausgezahlt — wöchentlich, alle zwei Wochen oder monatlich.
Hinweis: Empfehlenswert für Veranstalter:innen, die ihre Buchhaltung vereinfachen möchten.
Tickets & Ticketverkauf
Ticket personalization
When creating or editing a ticket category, you can enable various fields for ticket personalization:
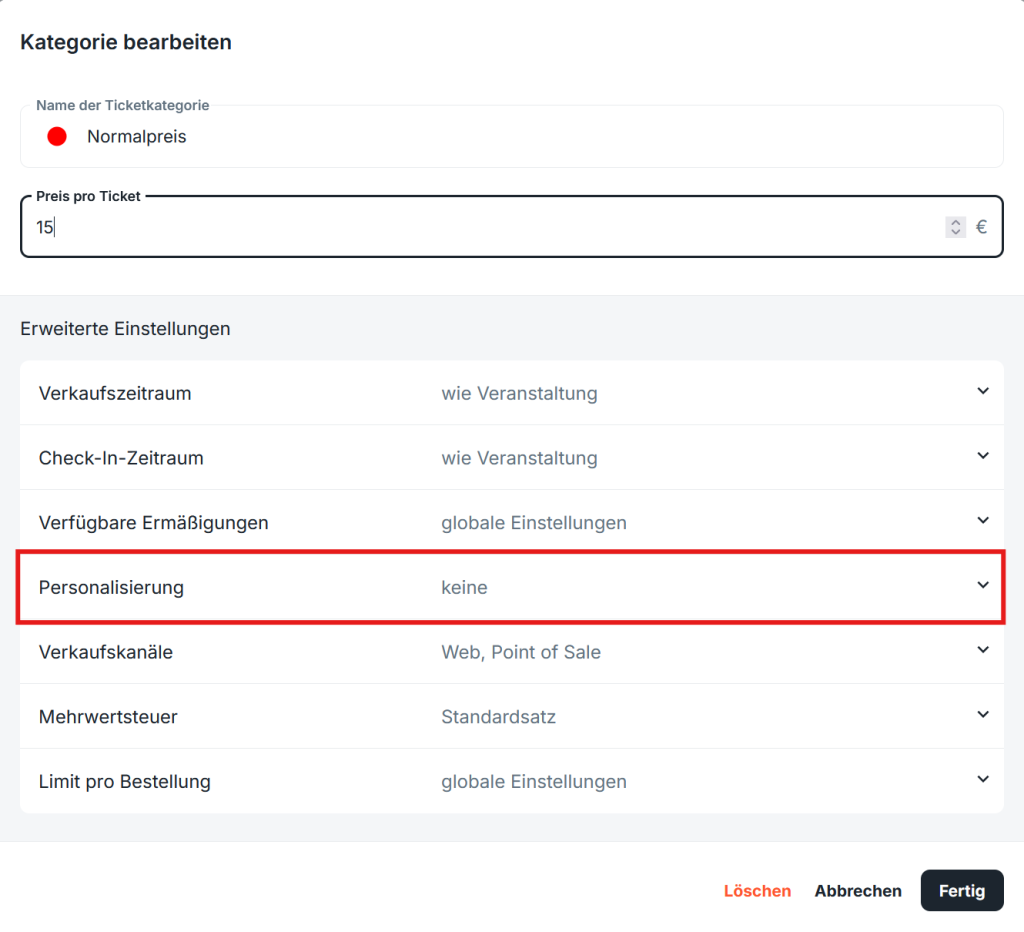
By default, buyers always have to provide an email address and a name for the order. Ticket personalization is useful when you want to collect additional information:
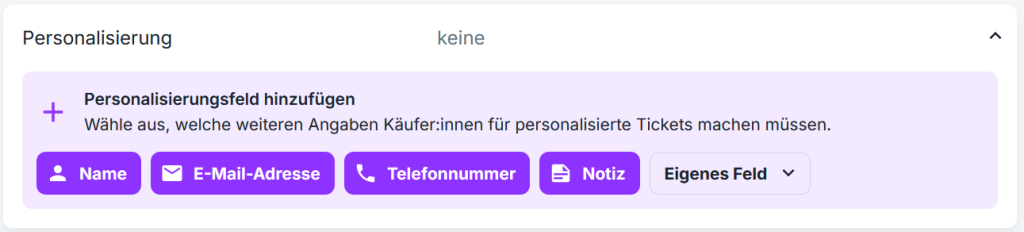
- Name of the ticket holder
- Email address of the ticket holder
- Phone number
- Notes field (optional)
- Custom field
Custom field
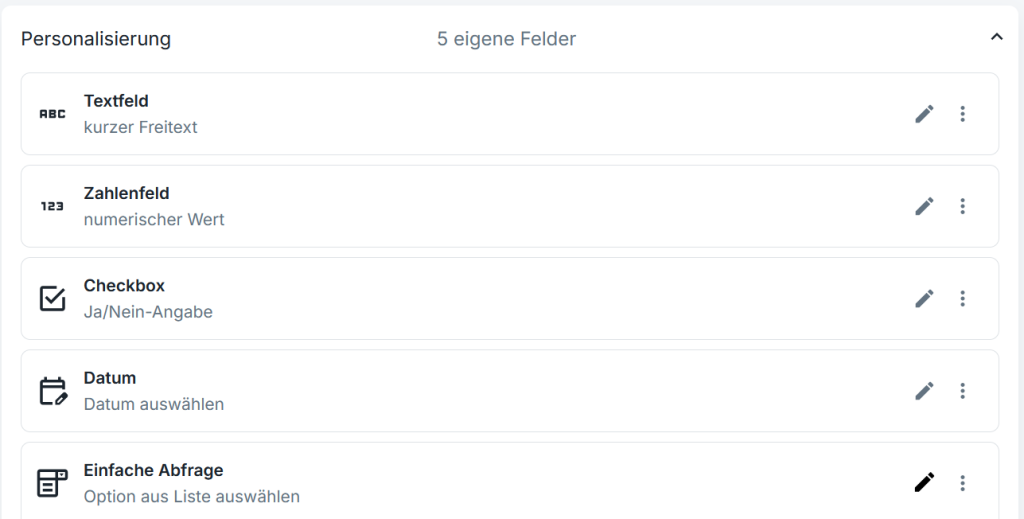
- You can define custom fields individually
- Text fields
- Number fields
- Date picker
- Checkboxes
- Simple questions
- Every new field can be defined as required or optional
Input mask
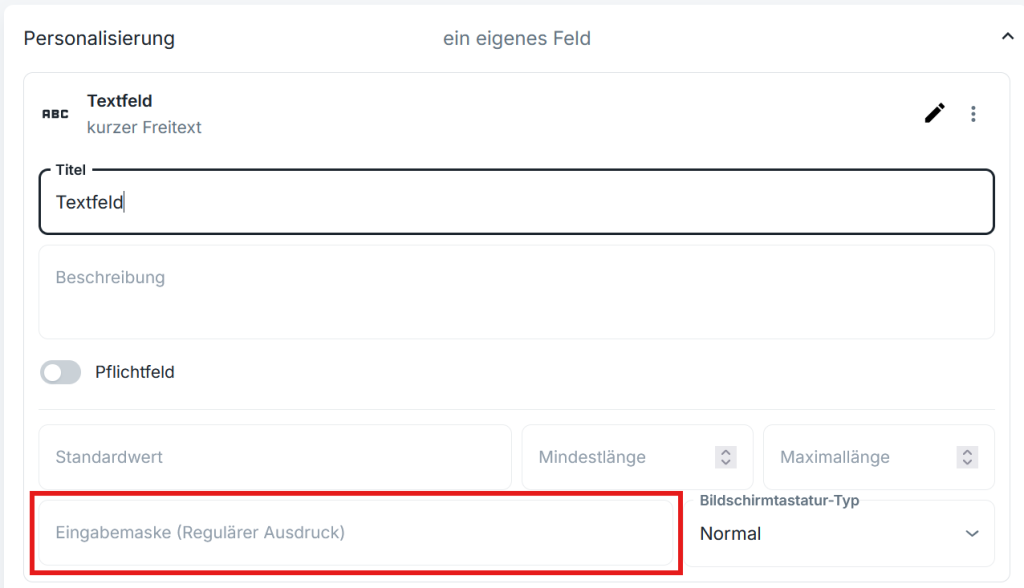
In the input mask, you can define a so-called pattern. You can find the details here.
For example:
[a-z] if only lowercase letters should be valid
[a-z] {4-8} if four to eight characters (lowercase letters) should be requested
[0-9] {4] if four digits should be requested
Ticket details
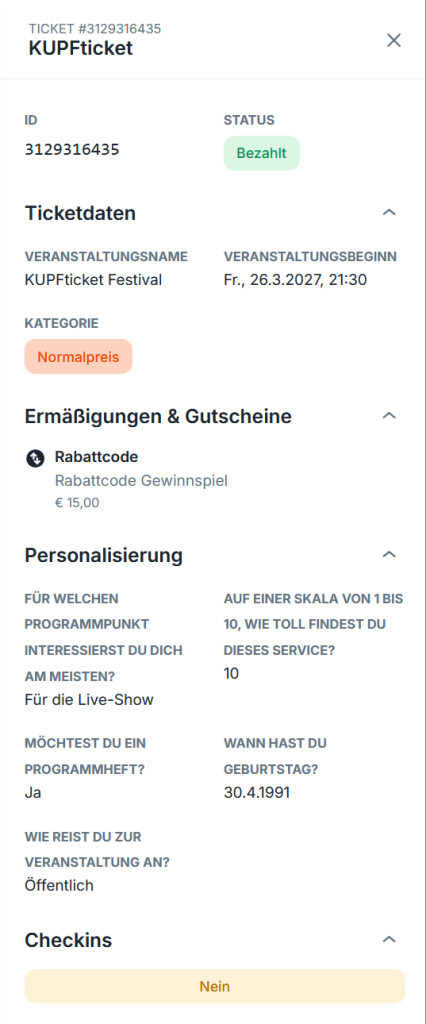
When you click on a ticket in the ticket list, an overlay with all the details appears on the right-hand side of the screen:

Create and edit categories
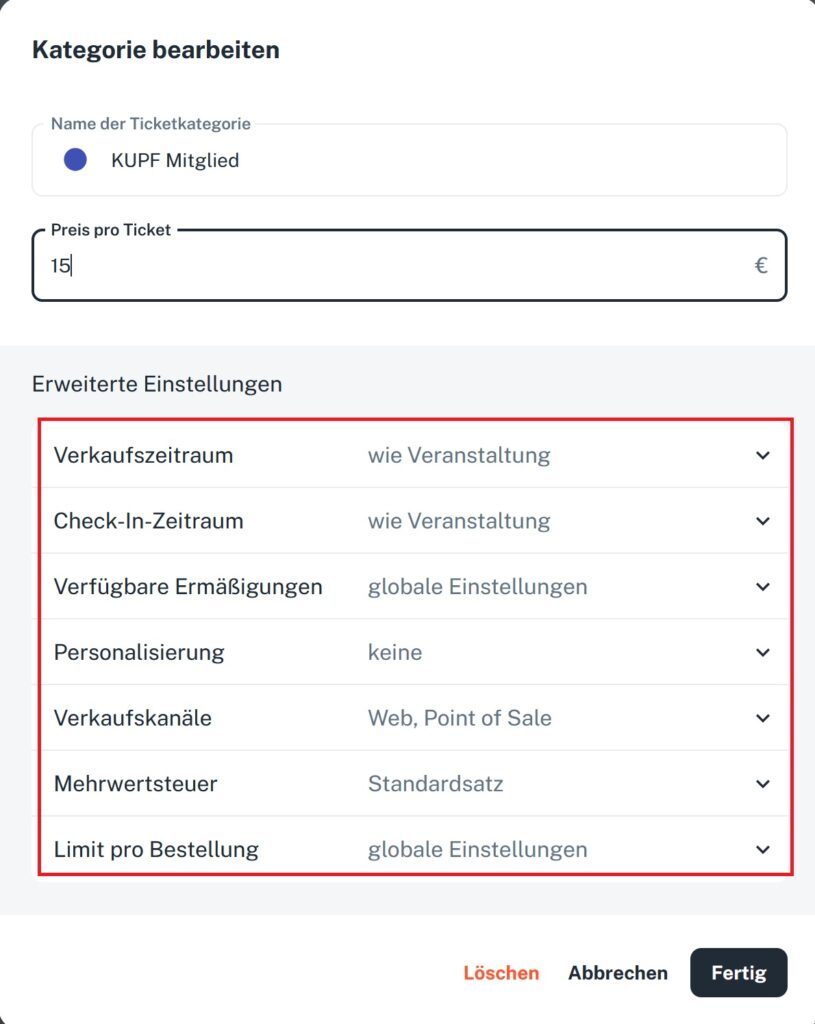
In the event editor, you can create ticket categories and edit them at any time. Among other things, you can set the sales period and the check-in period, select available discounts, and enable or disable the sales channels web and POS.
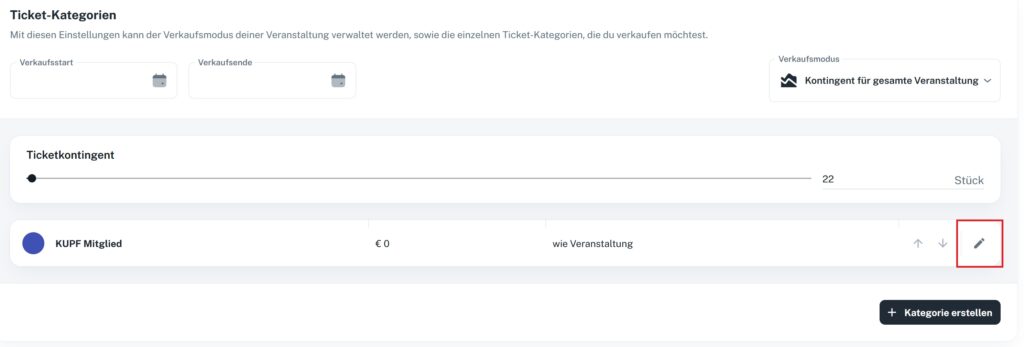
To enter edit mode, click the pencil icon directly on the ticket category (see screenshot). In the category’s advanced settings, you’ll find useful tools to fine-tune the sales of your event:
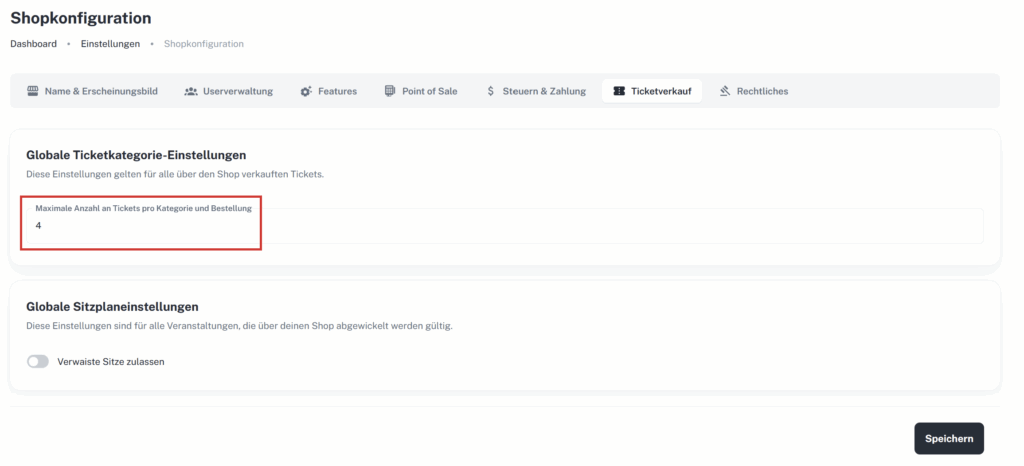
Maximum number of tickets per order
Under “Shop configuration” -> “Ticket sales”, you can set a maximum number of tickets per order for your shop:
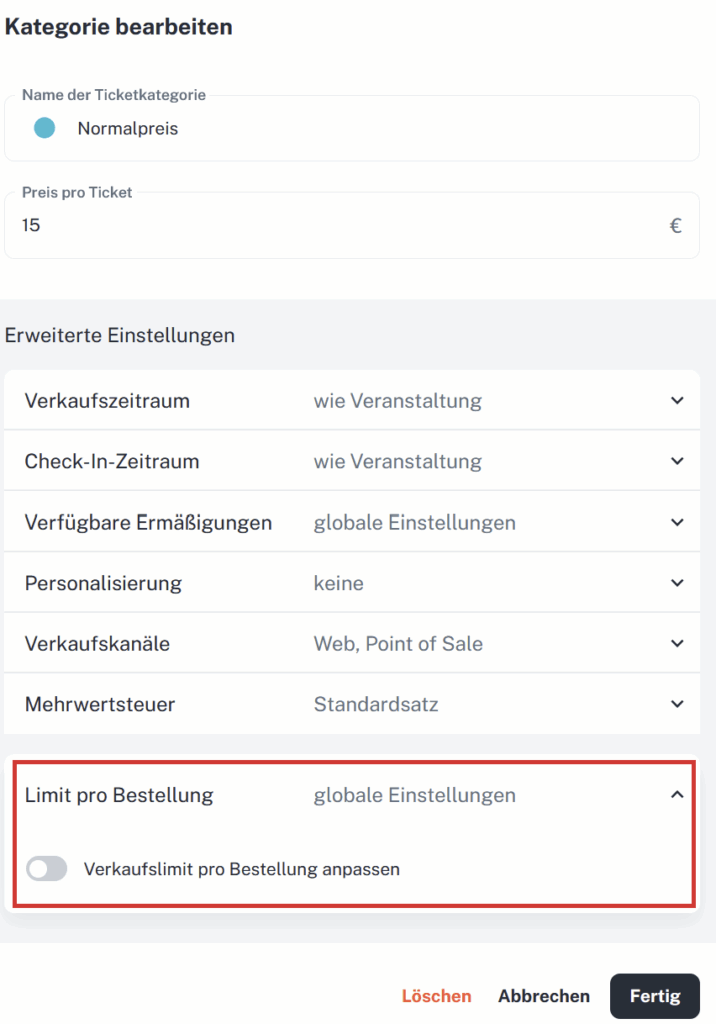
You can also adjust the limit in the advanced settings of a ticket category. This setting applies only to that category and overrides the global shop limit.
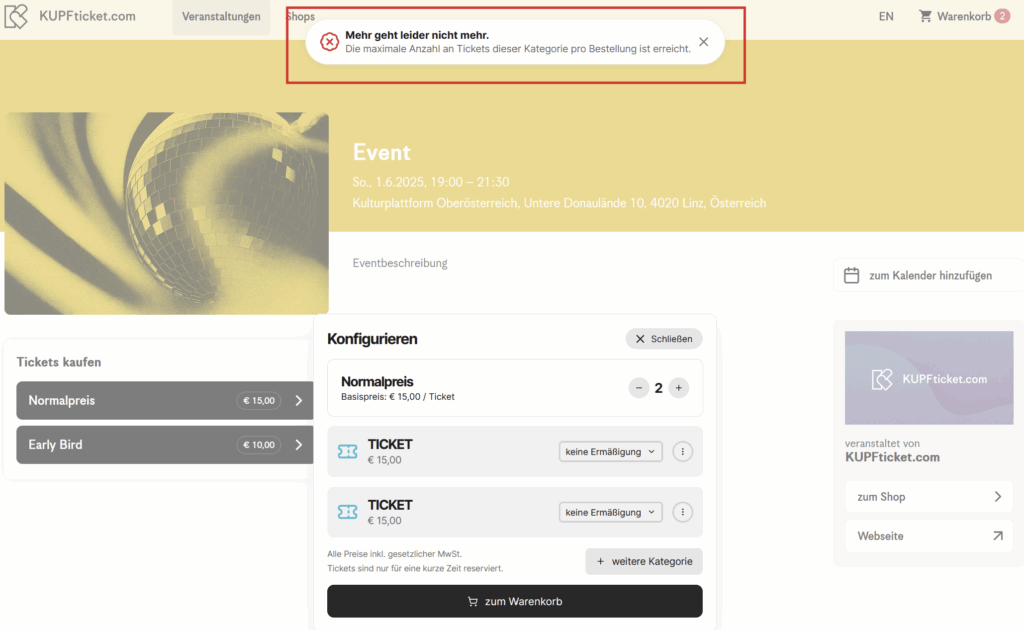
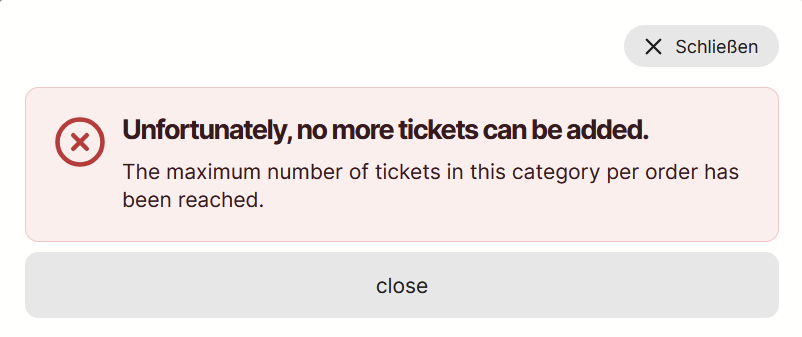
When buyers reach the limit in the shopping cart, an info popup appears:
Rebook tickets
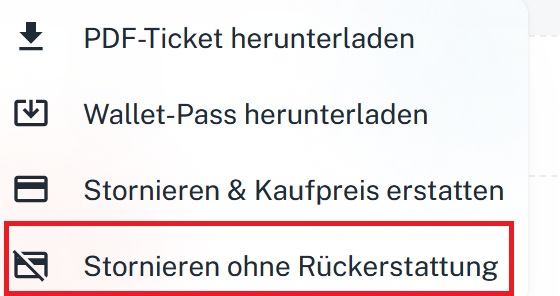
- Step: Cancel the ticket without a refund.
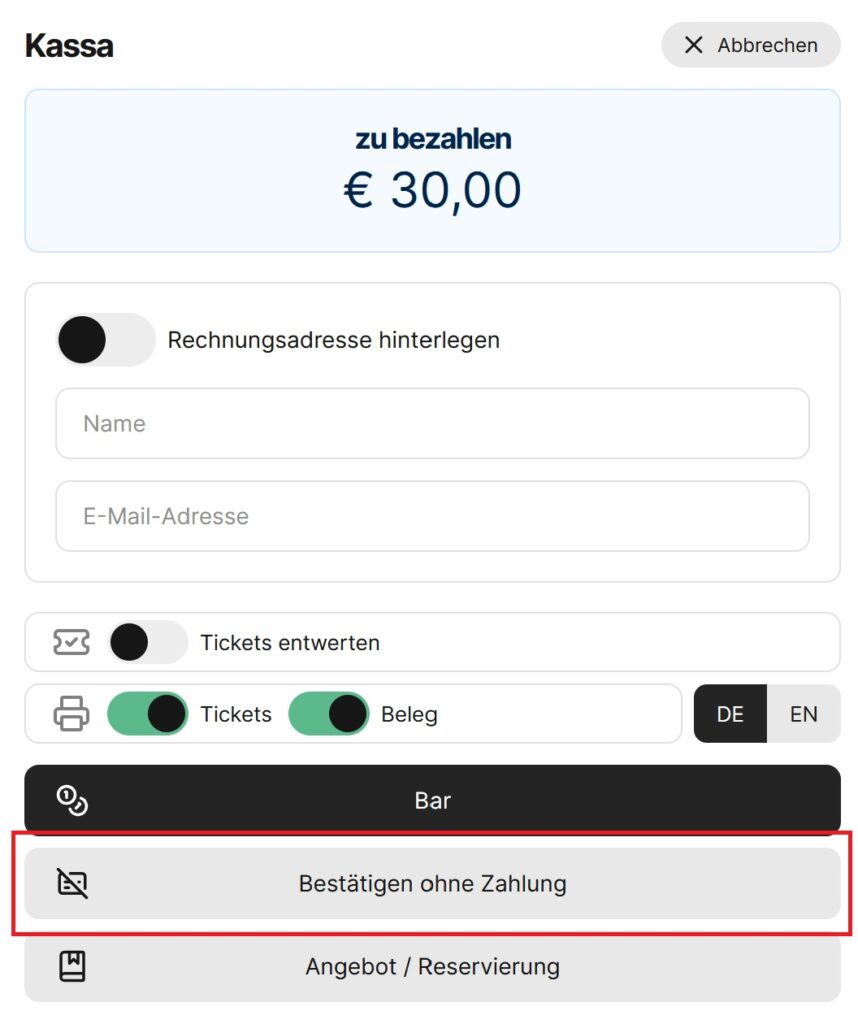
2. Step: Book the new ticket via the point of sale “without invoicing”.
How do I create free tickets?
KUPFticket currently offers several ways to issue complimentary tickets. Which option is suitable depends on where the free tickets are to be issued, whether specific seats are assigned, and how the tickets are to be evaluated later on.
Overview
| Option | Suitable for | Issued via | Evaluation |
|---|---|---|---|
| “Confirm without payment” | general admission and reserved-seat tickets | Point of sale | Filter by payment method |
| €0 ticket category | your own free ticket categories, e.g. general admission tickets | Point of sale | Filter by ticket category |
| 100% discount code | free tickets via the web shop | Web shop and point of sale | Web shop: “Free”; point of sale: filter by discount |
| POS category with 100% discount | reserved-seat tickets via the seating chart | Point of sale | Filter by €0 tickets |
1. “Confirm without payment” in the point of sale
In the point of sale, you can select “Confirm without payment” when selling.
A valid ticket is created, but no payment is recorded. The ticket therefore does not appear as revenue in the settlement. In the ticket list, you can filter by the payment method “Confirm without payment”.
This option is suitable, for example, for general admission and reserved-seat tickets when a ticket is to be issued free of charge and no separate free-ticket statistics are needed in the settlement.
2. Your own €0 ticket category for the point of sale
Another option is to create your own €0 ticket category. This category can be set up so that it is only available via the point of sale and not offered in the web shop.
To do so, go to the ticket category under “Edit category” → “Advanced settings” and disable the option “Sell via web”.
When selling via the point of sale, you can then select this €0 ticket category.
The tickets are created with a price of €0. In the settlement and statistics, however, they are currently not shown as a separate “free ticket” category. In the ticket list, the tickets can be filtered by the respective ticket category.
This option is suitable, for example, for general admission tickets where the main purpose is to record the number of tickets issued.
3. Discount code with 100% discount
Alternatively, you can create a discount code with a 100% discount.
When this discount code is used during a sale in the point of sale or in the web shop, the ticket price is reduced in full and the ticket is issued free of charge.
This option is particularly suitable for free tickets that are to be issued via the web shop. Tickets issued this way are shown as “Free” in the evaluation.
Tickets booked in the point of sale can be filtered in the ticket list via the “Discount” column.
4. Your own POS category with a fixed 100% discount
If free tickets are to be assigned to specific seats in the seating chart, you can create a separate POS category with a fixed discount of 100%.
When selling, first select the desired seat directly in the seating chart. Then select the corresponding POS category with the stored 100% discount. The regular ticket price is automatically reduced to €0.
The tickets issued can then be filtered as €0 tickets in the ticket list.
In the settlement and statistics, however, these tickets are currently not shown as a separate “free ticket” category.
This option is particularly suitable for free tickets with fixed seats, where seats are to be assigned via the seating chart.
Ticket individualisieren
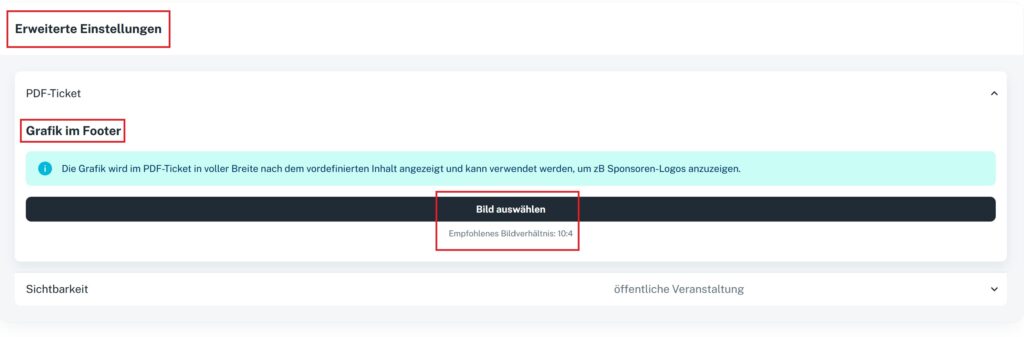
Das Ticket-Layout ist standardisiert. Dein Shop- und Event-Bild verleiht dem Ticket eine individuelle Note. Du kannst im Event-Editor zusätzlich ein zweites Bild hochladen, das den unteren Ticket-Bereich gestaltet.
Hier bringst du auch weitere Informationen unter, z.B. wenn das Ticket als Fahrschein gültig ist. Oder wenn du eine Logoleiste am Ticket benötigst, dann kannst du dies jederzeit über diese Option hinzufügen.
Unter “Veranstaltung bearbeiten” findest du ganz unten folgende Option:
Ermäßigungen & Rabattcodes
Ermäßigungen hinzufügen
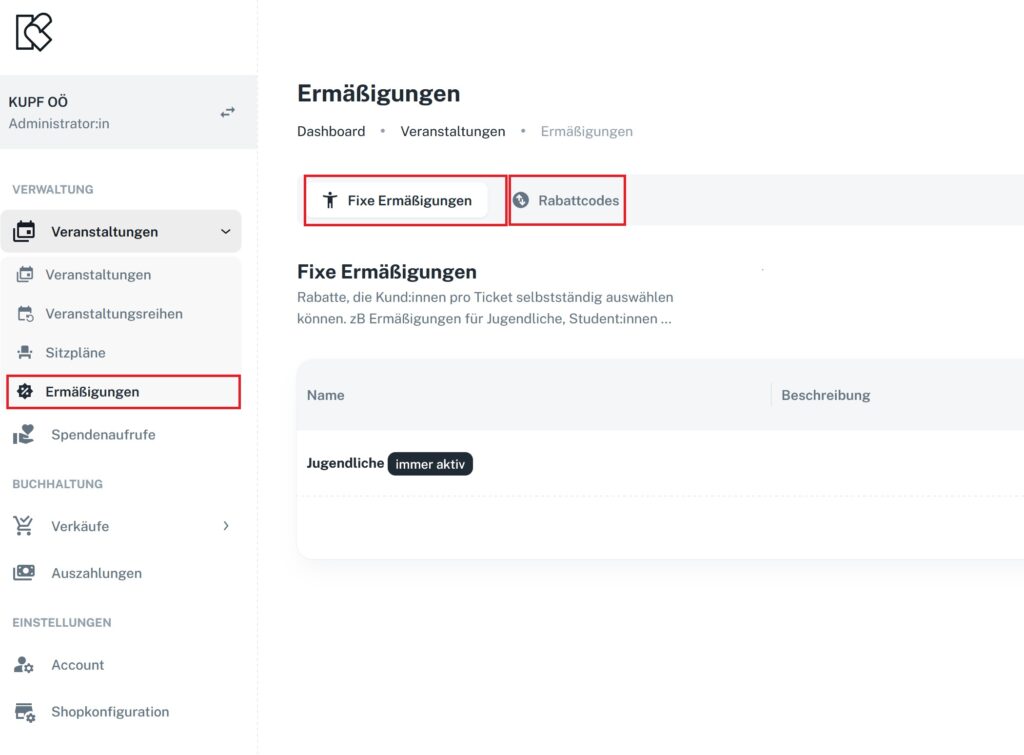
Im Hauptmenü unter „Veranstaltungen“ – „Ermäßigungen“ kannst du fixe Ermäßigungen hinterlegen und Rabattcodes (Promocodes) erstellen.
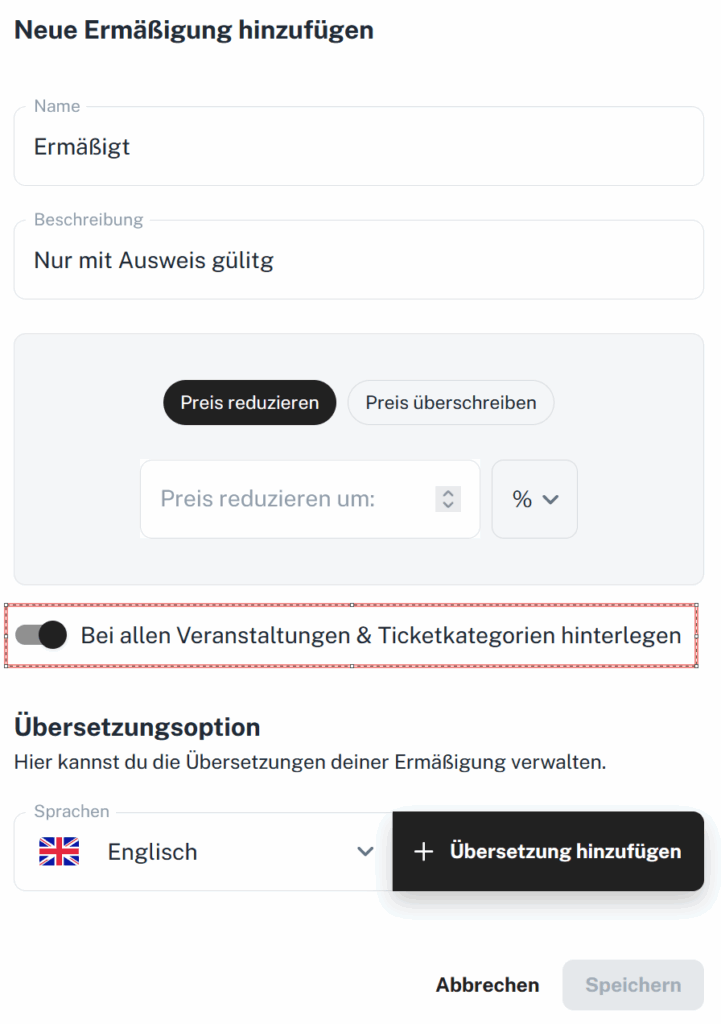
Globale Ermäßigungen sind für alle Events und Kategorien verfügbar. Du kannst eine globale Ermäßigung mit dem Schalter „Bei allen Veranstaltungen & Ticketkategorien hinterlegen” erstellen. Wenn du den Schalter deaktivierst, kannst du die erstellte Ermäßigung bei ausgewählten Kategorien in den erweiterten Einstellungen miteinbeziehen.
Bedingungen
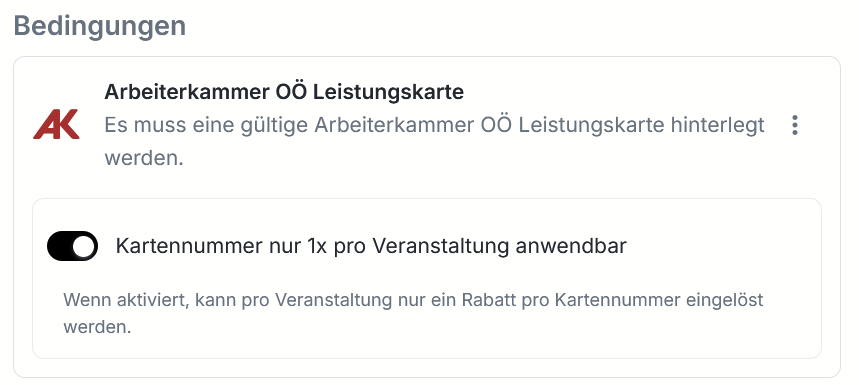
Arbeiterkammer OÖ Leistungskarte
Bei den fixen Ermäßigungen könnt ihr nun auch die Leistungskarte der Arbeiterkammer Oberösterreich integrieren.
Beim Ticketkauf wird die Kartennummer live validiert und die Ermäßigung automatisch gewährt.
Achtung: Aktuell ist diese Funktion ausschließlich für Leistungskartenbezieher:innen aus Oberösterreich verfügbar.
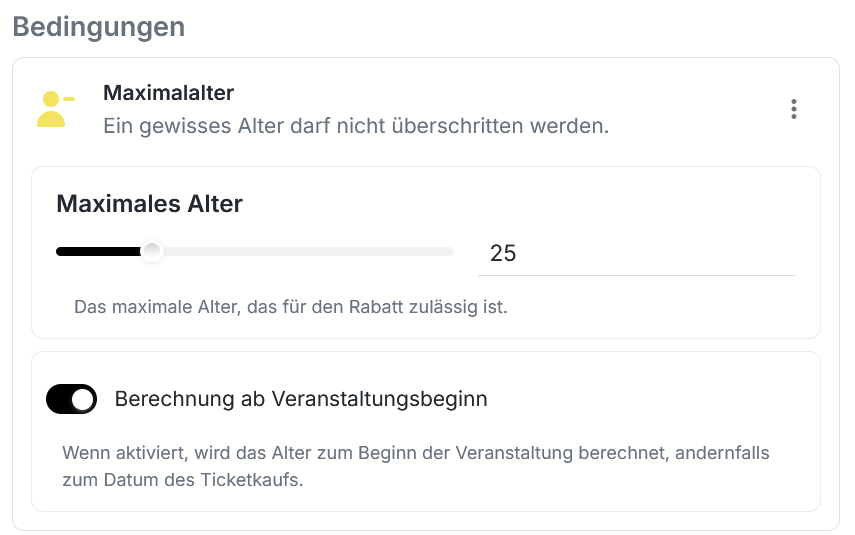
Altersprüfung
Beim Ticketkauf wird das Alter abgefragt und die Ermäßigung automatisch gewährt.
Ihr könnt ein beliebiges Maximalalter definieren. Beim Kauf bestätigen Käufer:innen ihr Geburtsdatum.
Das ist besonders praktisch für Jugendermäßigungen.
Rabattcodes erstellen
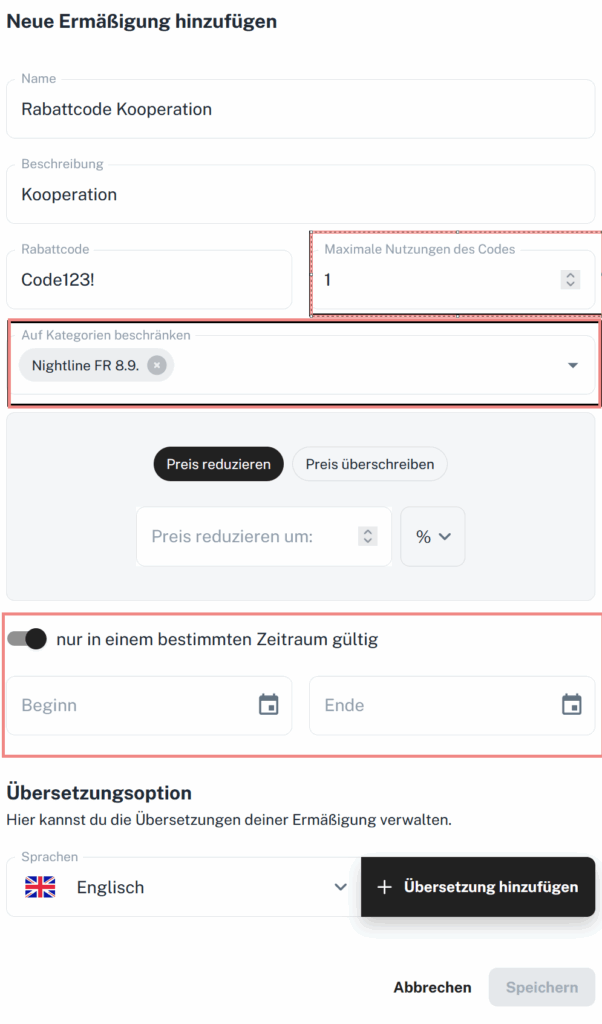
Bei Rabattcodes hast du die Möglichkeit, den Gültigkeitszeitraum und die Anzahl der möglichen Nutzungen des Codes zu definieren. Zusätzlich kannst du Rabattcodes auf einzelne Kategorien beschränken.
Veranstaltungen
Visibility of your event
At the very bottom of the event editor, under “Advanced settings“, you’ll find the option “Visibility“:
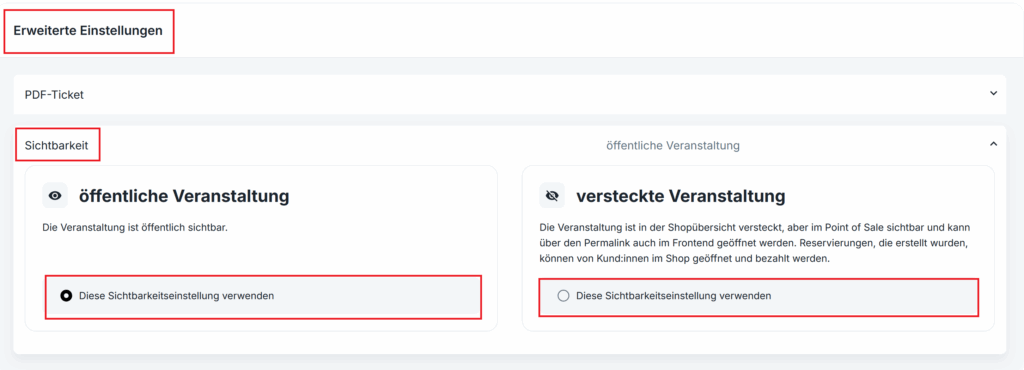
Public events are listed in the web shop.
Hidden events can only be accessed by buyers via the direct URL.
Create an event
Create an event
In the main menu on the left, you’ll find the entry “Events”. In the top right corner, you can create a new event with “+Create”.
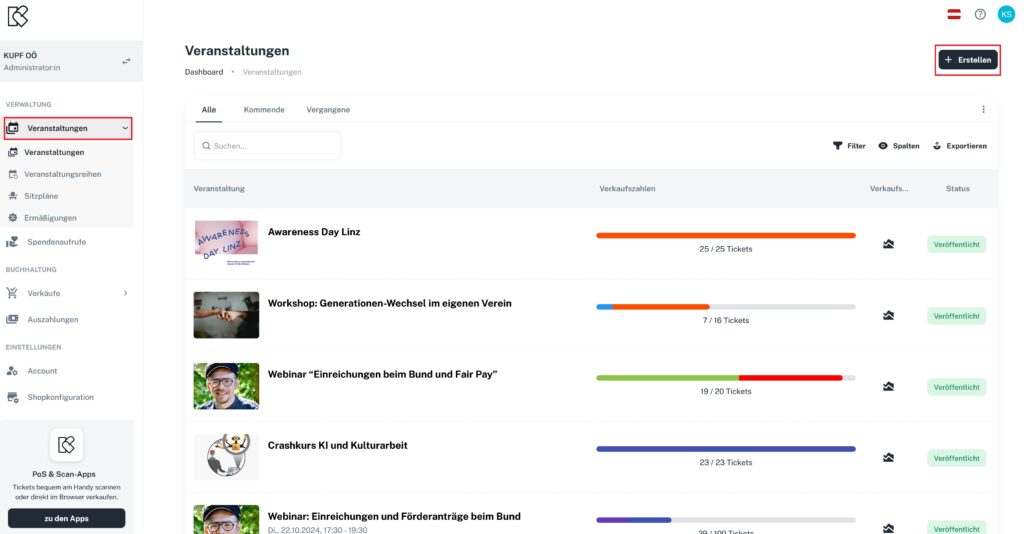
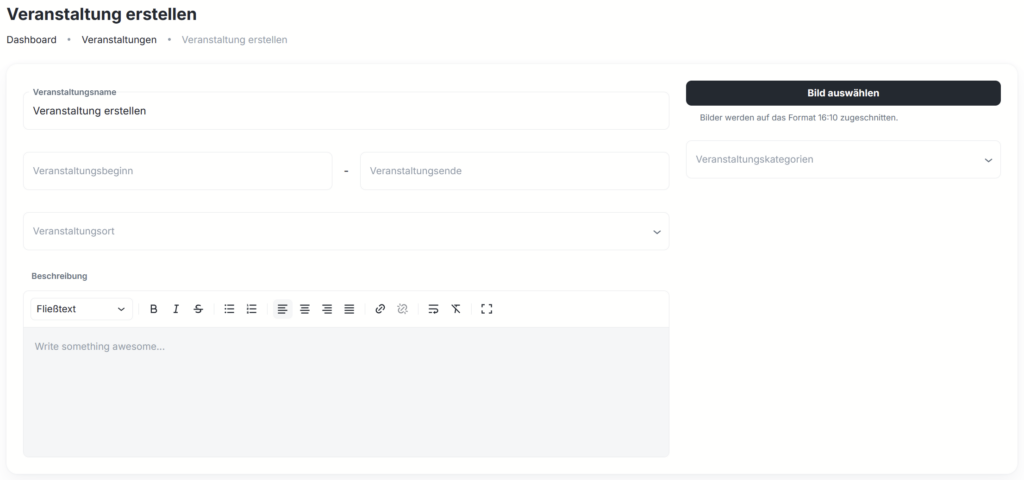
In the event editor, you can create your event and edit it at any time: enter the event name, upload an image, define the event period, set the venue and add an event description.
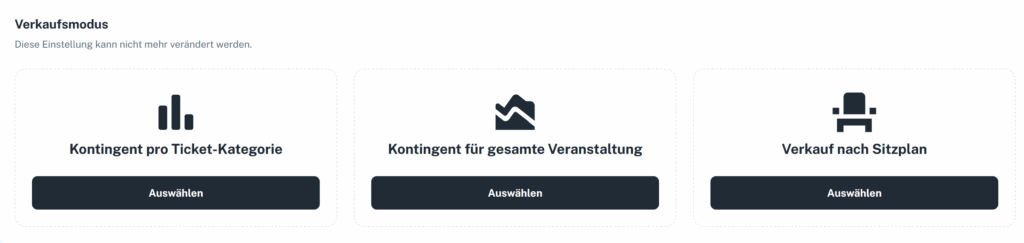
In the next step, you choose the sales mode.
Add a venue
Venues that don’t appear in the search (because they aren’t listed on OpenStreetMap) can now be added and saved by you.
You can create and edit venues directly within events and event series.
Venues no longer have to be added anew every time – they remain permanently saved.

Select event categories
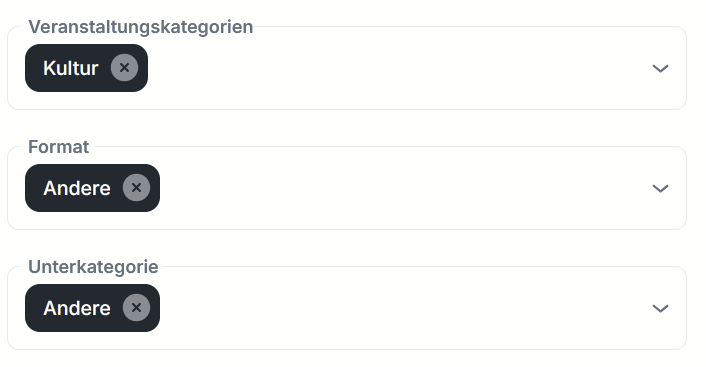
When creating new events, you can now select suitable main and sub-categories. A total of five main categories with their respective sub-categories are available.
Once enough events have been categorized, we can integrate a search and filter function into the web shop and, in the future, also recommend similar events to buyers. That means more visibility for your events.
Cancel an event
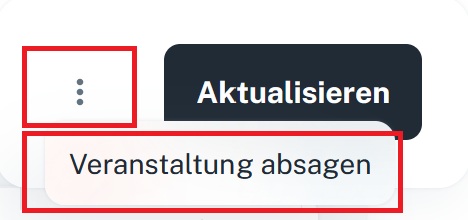
If you ever need to cancel an event, you’ll find the function under “Edit event”. Simply click the three dots next to “Update” and select “Cancel event”:
Mehrsprachigkeit bei Veranstaltung einstellen
KUPFticket.com kann standardmäßig in Deutsch und Englisch verwendet werden. Zusätzlich hast du die Möglichkeit, den Titel der Veranstaltung sowie die Beschreibung, einzelne Kategorien, Ermäßigungen und Rabattcodes zu übersetzen.

Veranstaltungsreihe erstellen
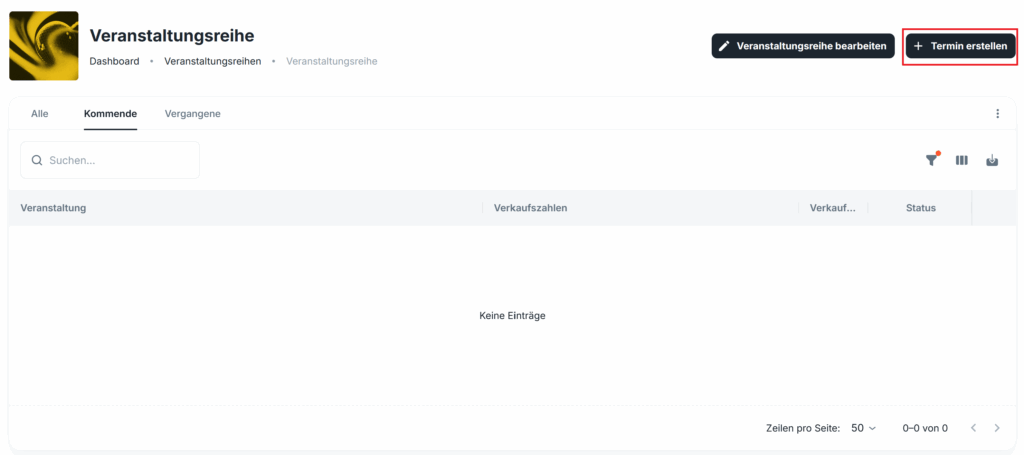
Du legst die Veranstaltungsreihe einmal an und musst anschließend nur noch die einzelnen Termine der Vorstellungen definieren.
Jedes Event innerhalb der Reihe kannst du dabei individuell anpassen.
Sobald die Veranstaltungsreihe erstellt ist, kannst du die einzelnen „Termine erstellen“.
Verkaufsmodus
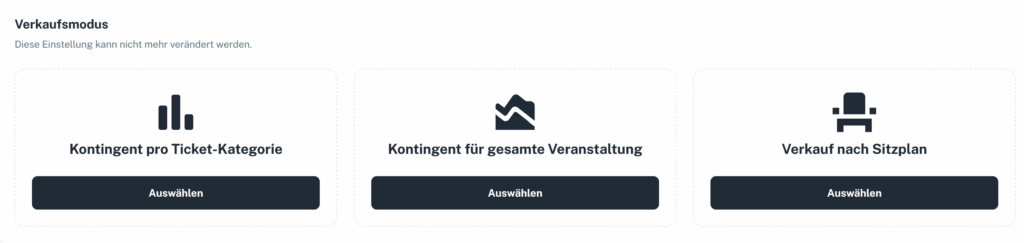
Bei der Erstellung von Veranstaltungen stehen dir drei Optionen zur Auswahl:
1) „Kontingent pro Ticket-Kategorie“: Hier könnt ihr die Kontingente pro Ticket-Kategorie selbst wählen und jederzeit manuell anpassen.
2) „Kontingent für gesamte Veranstaltung“: Hier könnt ihr ein Gesamtkontingent für die gesamte Veranstaltung definieren.
3) „Verkauf nach Sitzplan“: Bei der Sitzplan-Option ist das Ticket-Kontingent abhängig vom Saalplan.
Erste Schritte
Who can use KUPFticket?
We work with the payment service provider STRIPE.
The following organizations are accepted by STRIPE (important!):
- Companies, sole proprietors, partnerships, corporations and non-profit organizations with their registered office and actual business address in Austria.
- Authorized representative: at least 18 years old. Between 13 and 17 only with the written consent of a parent or legal guardian; under 13 not permitted at all.
- Authorized representative: at least 18 years old. Between 13 and 17 only with the written consent of a parent or legal guardian; under 13 not permitted at all.
- Documentation:
- Company register number or ZVR number (Austrian register of associations)
- For self-employed persons: VAT ID or other proof of business
- Austrian, SEPA-enabled business bank account
- Reachable by phone
- Functioning business website.
- Company register number or ZVR number (Austrian register of associations)
- Proof of identity and address (KYC):
- Passport, Austrian ID card, driver’s license, residence permit or alien’s passport; for residents outside Austria, a passport is mandatory.
Excluded
- Any use by private individuals without a registered business or association.
- Legal entities without a registered office in Austria.
- Minors under 13; 13- to 17-year-olds without parental or organizational representation.
- Persons or companies from high-risk jurisdictions (Cuba, Iran, North Korea, Syria, Crimea/Donetsk/Luhansk) or on sanctions lists.
- Business areas on the “Prohibited Businesses” list, including illegal goods, drugs, pornography, gambling, high-risk financial services and arms dealing.
Schritt-für-Schritt-Anleitung: Shop erstellen und aktivieren
Du möchtest deinen ersten Shop bei KUPFticket erstellen? Mit dieser Anleitung führen wir dich Schritt für Schritt durch die Einrichtung.
Unser Tipp: Halte die benötigten Unterlagen und Informationen bereit und gehe die einzelnen Schritte der Reihe nach durch. Wir haben außerdem eine ausführliche Schritt-für-Schritt-Anleitung zur Shoperstellung und Aktivierung erstellt.
In der Regel dauert das Onboarding nicht länger als 15 Minuten!
1. Shop erstellen
Melde dich bei KUPFticket an und erstelle einen neuen Shop.
Bei der Shoperstellung werden verschiedene Angaben zu deiner Organisation abgefragt. Fülle alle Felder vollständig und korrekt aus.
2. Stripe-Konto einrichten
Für die Zahlungsabwicklung wird ein Stripe-Konto benötigt. Die Einrichtung und Verifizierung erfolgt direkt über unser Onboarding.
Während der Einrichtung fragt Stripe verschiedene Informationen zu deiner Organisation und zu den vertretungsberechtigten Personen ab.
Besonders wichtig für Vereine
Bei Vereinen können die Fragen von Stripe teilweise missverständlich sein.
Insbesondere sollten Vereine bei den folgenden Fragen keine zusätzlichen Rollen angeben:
- Inhaber
- Direktor
- Vorstandsmitglieder
Wenn ihr beispielsweise bei einem Verein zusätzliche Unternehmensrollen wie „Vorstand“ „Inhaber“ oder „Direktor“ angebt, kann Stripe die Organisation als klassisches Unternehmen einstufen. Dadurch kann es passieren, dass ein ZVR-Auszug nicht mehr als Unternehmensnachweis akzeptiert wird und Stripe zusätzliche Dokumente anfordert.
Für Vereine empfehlen wir daher dringend, unsere Ausfüllhilfe zur Shoperstellung und Aktivierung zu verwenden. Dort zeigen wir anhand der einzelnen Stripe-Schritte, welche Angaben gemacht werden müssen und welche Optionen bei einem Verein auszuwählen sind.
3. Vertretungsberechtigte Person angeben
Bei einer Organisation muss die verantwortliche Person korrekt angegeben werden.
Als verantwortliche Person muss eine Person angegeben werden, die im ZVR-Auszug oder Firmenbuch als vertretungsberechtigte Person aufscheint.
Wichtig: Bei der Privatadresse der verantwortlichen Person ist die tatsächliche Wohnadresse dieser Person anzugeben, nicht die Adresse des Vereins.
4. Organisationsadresse prüfen
Achte darauf, dass die Organisationsadresse mit der Adresse auf deinem offiziellen Nachweis übereinstimmt.
Auch scheinbar kleine Abweichungen bei der Schreibweise können bei der automatisierten Prüfung zu Rückfragen führen.
5. Benötigte Dokumente bereithalten
Je nach Organisationsform und Angaben kann Stripe einen Nachweis verlangen.
Für Vereine ist in der Regel insbesondere der aktuelle ZVR-Auszug relevant.
Zusätzlich kann Stripe einen Identitätsnachweis oder einen Nachweis der Privatadresse der verantwortlichen Person verlangen.
Lade Dokumente immer vollständig und gut lesbar hoch und achte darauf, dass sie noch gültig bzw. aktuell sind.
6. Stripe-Verifizierung abschließen
Überprüfe vor dem Abschluss noch einmal alle Angaben.
Wenn Stripe keine weiteren Informationen benötigt, ist die Verifizierung abgeschlossen.
Sollte Stripe zusätzliche Informationen oder Dokumente anfordern, folge den Anweisungen direkt in deinem Stripe-Konto.
Du hast bei der Einrichtung versehentlich falsche Rollen angegeben? Dann ändere die Angaben möglichst, bevor du weitere Dokumente hochlädst. Auch wenn Stripe bereits zusätzliche Nachweise verlangt, kannst du deine Angaben immer noch korrigieren.
7. Shop aktivieren
Nachdem die erforderlichen Angaben vollständig hinterlegt und die Stripe-Verifizierung abgeschlossen ist, ist dein Shop aktiv.
Ausführliche Anleitung für Vereine
Für Vereine empfehlen wir, die Einrichtung anhand unserer Ausfüllhilfe „Shop erstellen und aktivieren“ durchzuführen. Darin sind die einzelnen Schritte inklusive der Stripe-Verifizierung mit Screenshots erklärt.
Marketing – Logos und Patches
Logos und Icons für deine Website, dein Plakat oder deine Social Media Kanäle findest du hier.
Userverwaltung
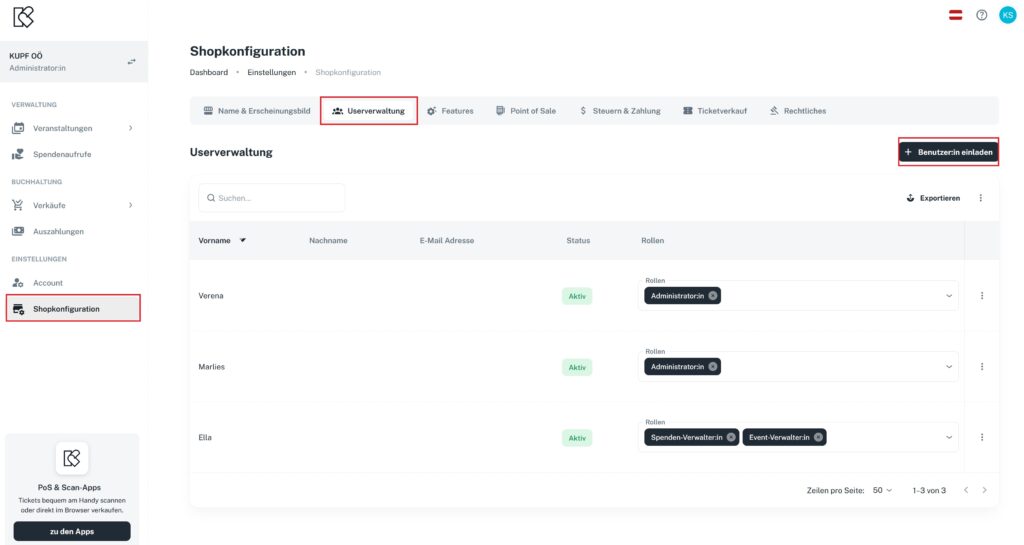
Die Userverwaltung findest du in der Shopkonfiguration. Dort kannst du jederzeit neue Nutzer:innen zu deinem Shop hinzufügen und ihnen die passenden Rollen zuweisen.
| Rolle | Berechtigungen |
|---|---|
| Administrator:in | Kann alle Einstellungen vornehmen und besitzt alle Rechte |
| Event-Verwalter:in | Kann alle Einstellungen vornehmen, außer die Shop-Metadaten zu ändern |
| Rechnungsmanager:in | Kann Rechnungen einsehen und Rückerstattungen durchführen |
| Eintrittsmanager:in | Kann das PoS (Point of Sale) für den Vor-Ort-Verkauf nutzen |
| Check-in-Manager:in | Kann die Scanfunktion in der App nutzen |
Hinweis: Der Account, mit dem der Shop erstellt wurde, ist der sogenannte Superadmin (Shopowner) und benötigt keine zusätzliche Rolle. Solltest du den Shopowner ändern wollen, melde dich bitte bei uns.
Scan & Kassa, Point of Sale & Tap to Pay
Tap to Pay
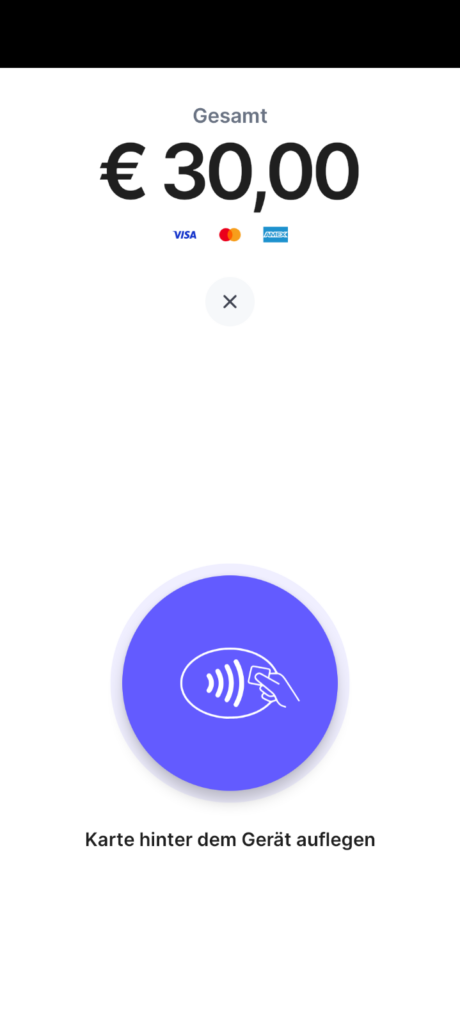
You can enable the feature directly in the app. If you run into problems, you can check the payment provider’s list to see whether your smartphone is supported:
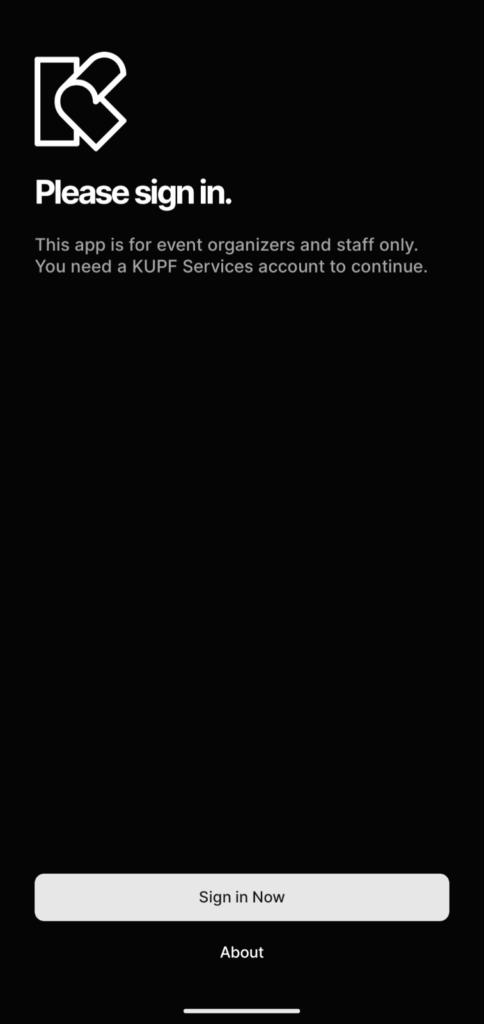
Simply sign in to the app with your KUPFticket.com login details to get access to your shop:
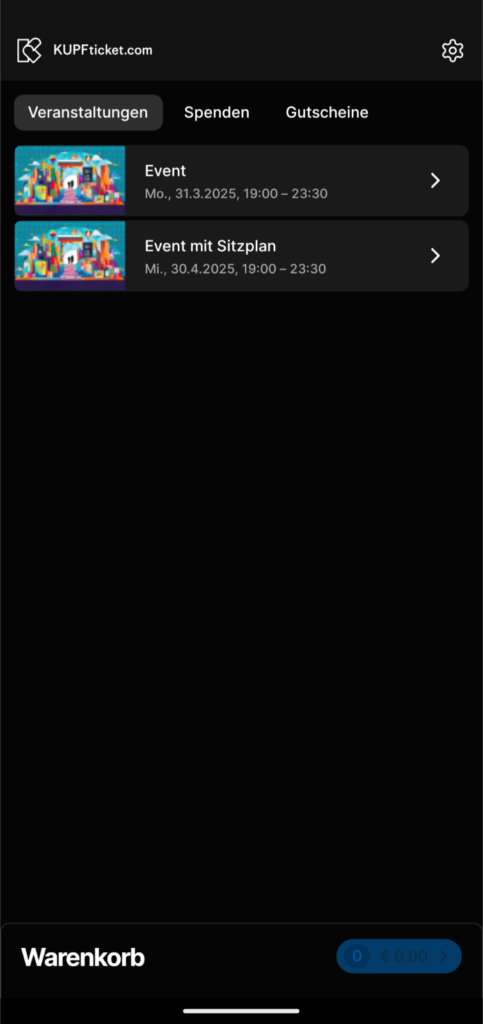
✔ Now you can sell tickets and vouchers and accept donations directly in the app:
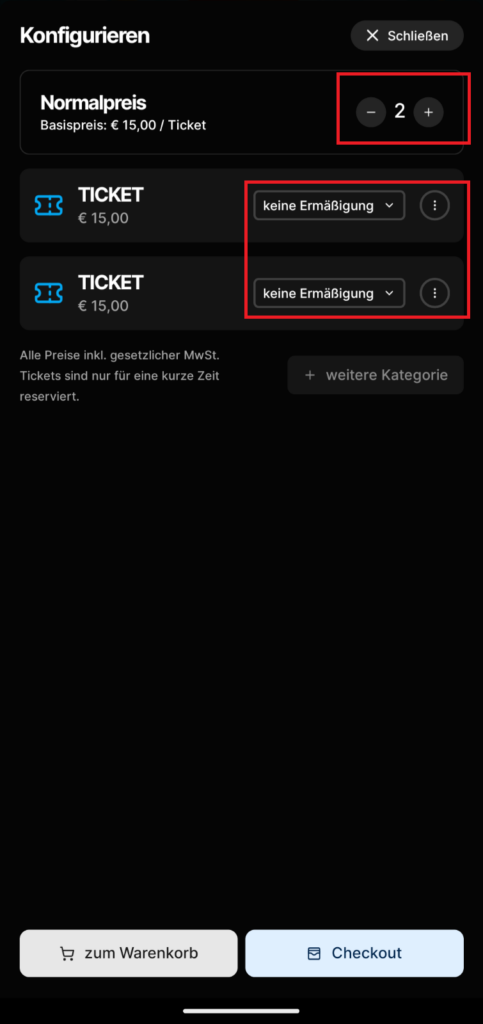
✔ Convenient shopping cart handling
✔ With the app, you can sell general admission tickets and reserved-seat tickets:
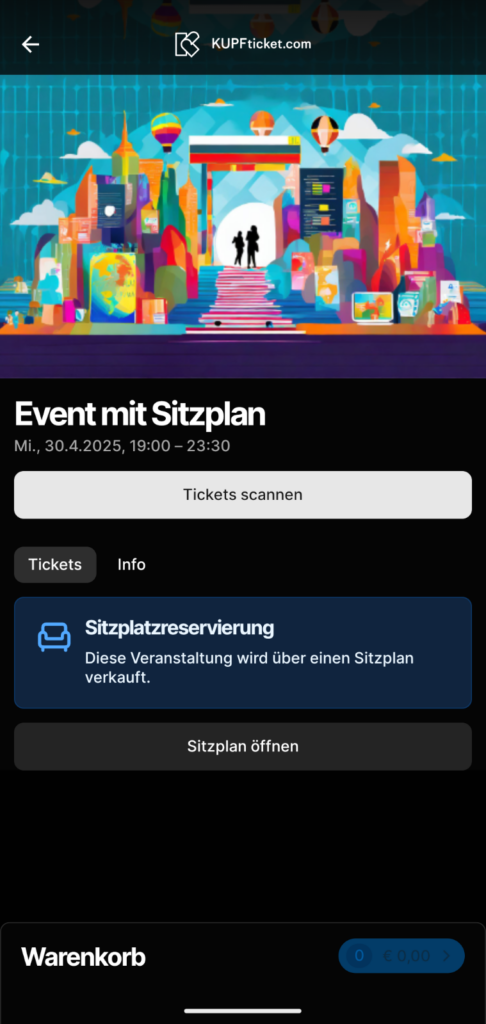
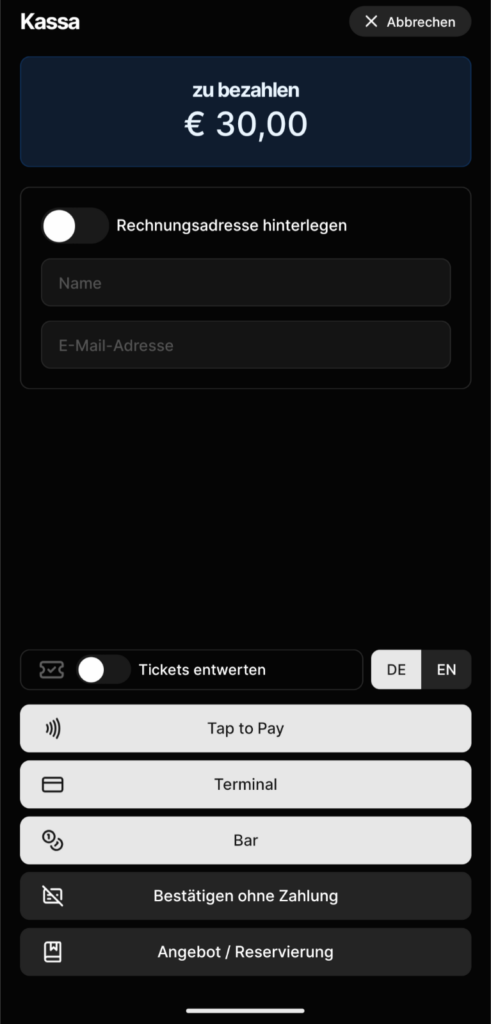
✔ Easy ticket sales with the Tap to Pay feature work with debit cards, credit cards as well as Google Pay and Apple Pay:
App access
User management and roles: The familiar user management lets you add new users to the shop. They can either only scan tickets or also sell them. That way, your admin login stays secure.
Point of sale – configure ticket printer
1) Install the driver
https://www.brother.de/support/ql-800/downloads
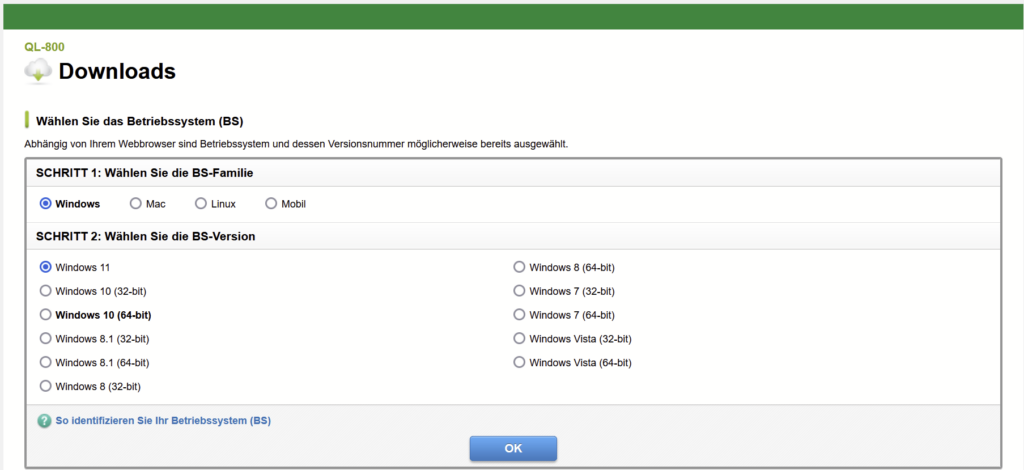
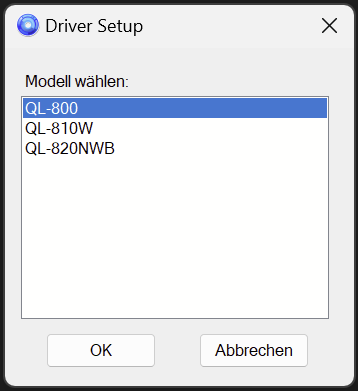
2) Connect the device to the PC via USB cable
3) Open the print settings in the PC’s system settings (not in the browser), select 54 mm as the ticket width and manually set the ticket length to 140 mm.
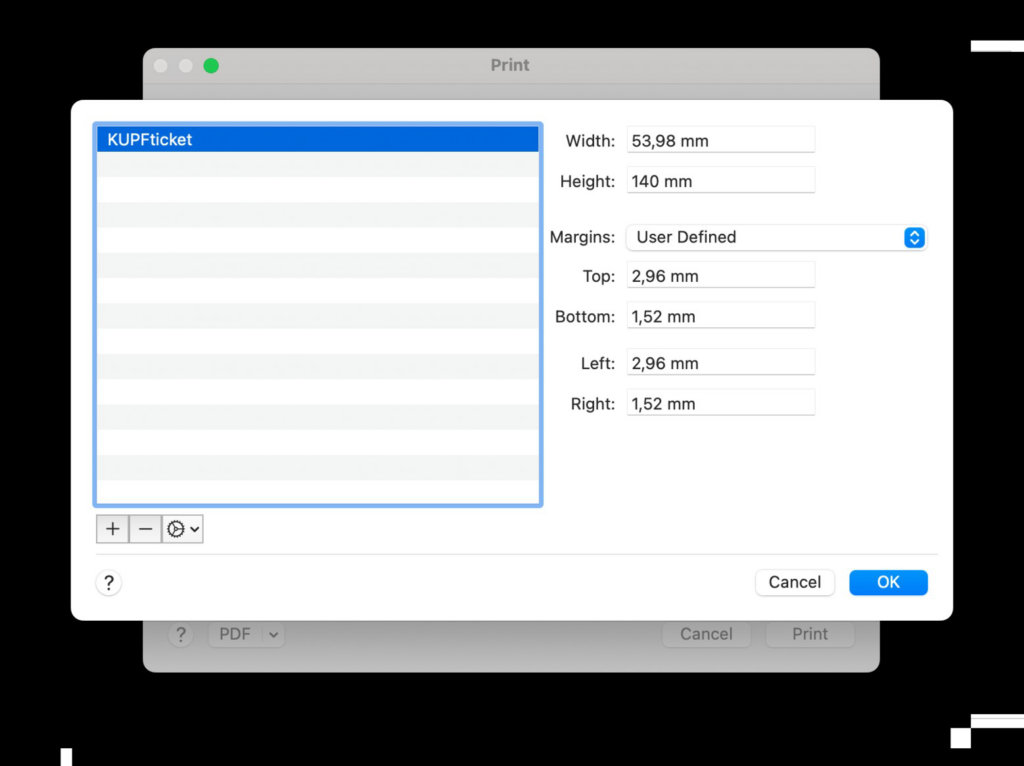
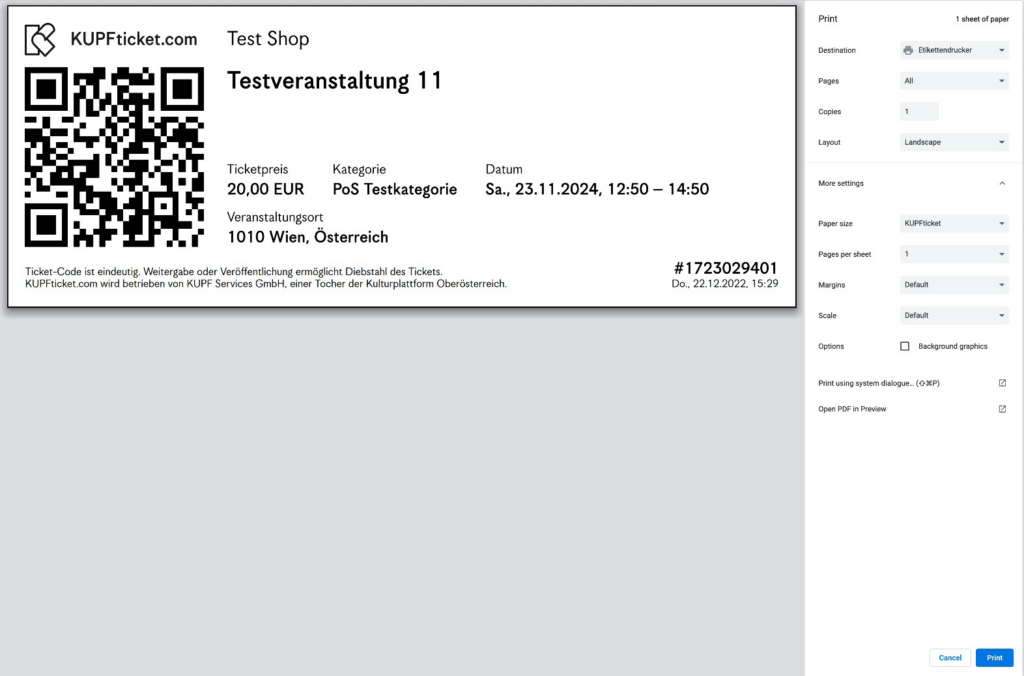
4) In the browser’s print dialog, define the following settings:
Point of sale – ticket rolls
Here you can find the ticket rolls for the ticket printer:
Brother Store
You can find cheaper alternatives in the usual online shops.
Point of sale – reservations
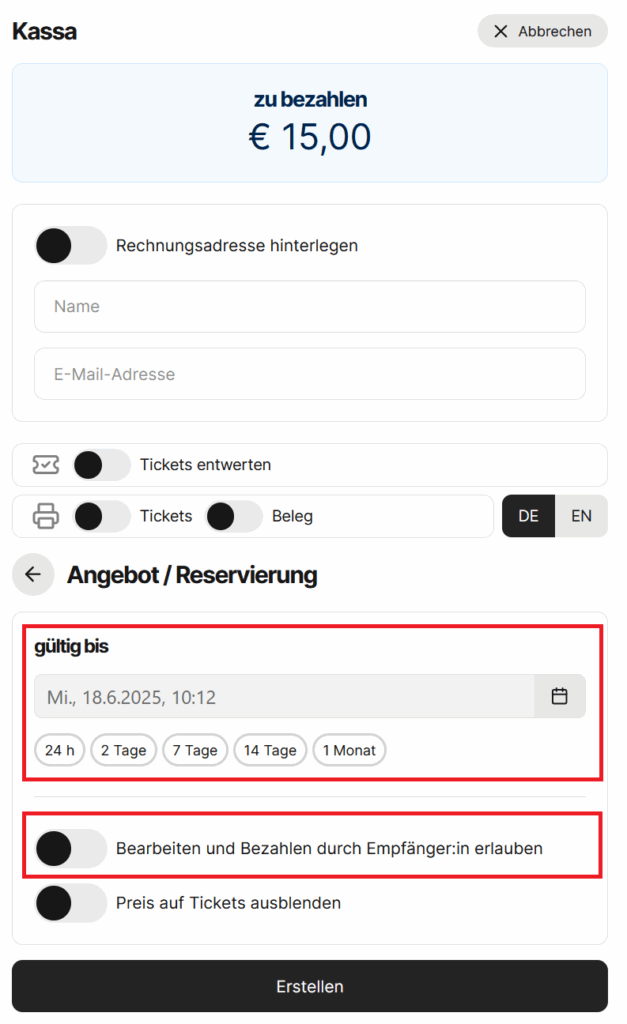
You can take reservations in the point of sale via the option “Create offer / reservation“.
If you enter the buyer’s email address and enable the option “Allow editing and payment by recipient”, the buyer can complete the payment process themselves.
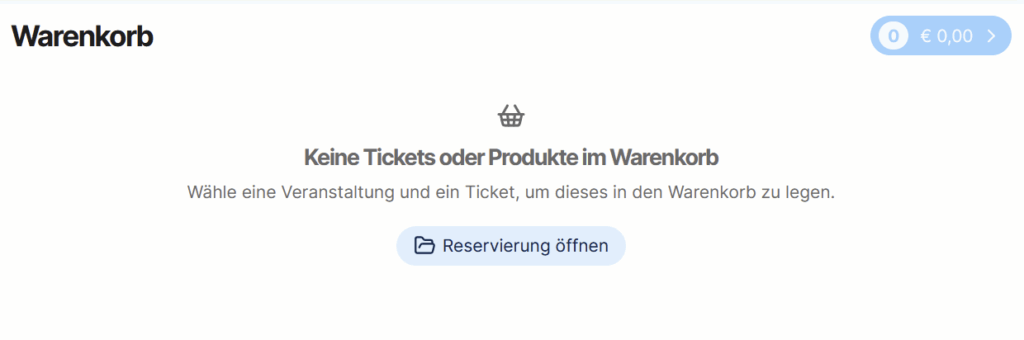
Under “Open reservations”, you can open reservations in the shopping cart at any time and complete the payment process (in cash or via terminal).
Point of sale – buy or rent hardware
Point of sale (POS) stations such as box offices or advance sales outlets can be equipped with directly integrated card terminals and a printing system. The Stripe terminal connects to the ticket shop via the internet. The printer is connected to the PC or laptop via USB.
Purchase
POS card terminal: €299 net + VAT
POS card terminal docking station: €45 net + VAT
POS printer: €139.00 net + VAT
Rental
POS card terminal: €12 net + VAT per day
POS card terminal docking station: €2 net + VAT per day
POS printer: €6 net + VAT per day
Per rental, a flat fee of €30 net + VAT for preparation and return, regardless of the number of devices.
In case of damage to the devices, the renter is liable for repair or replacement costs.
Please order in good time – depending on device availability, delivery can take up to three weeks.
Point of sale – how do I sell tickets?
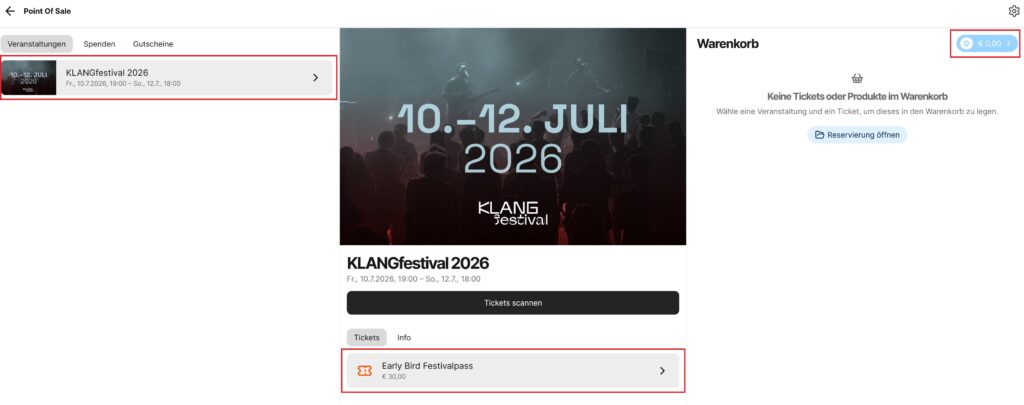
1) Select the event and category:
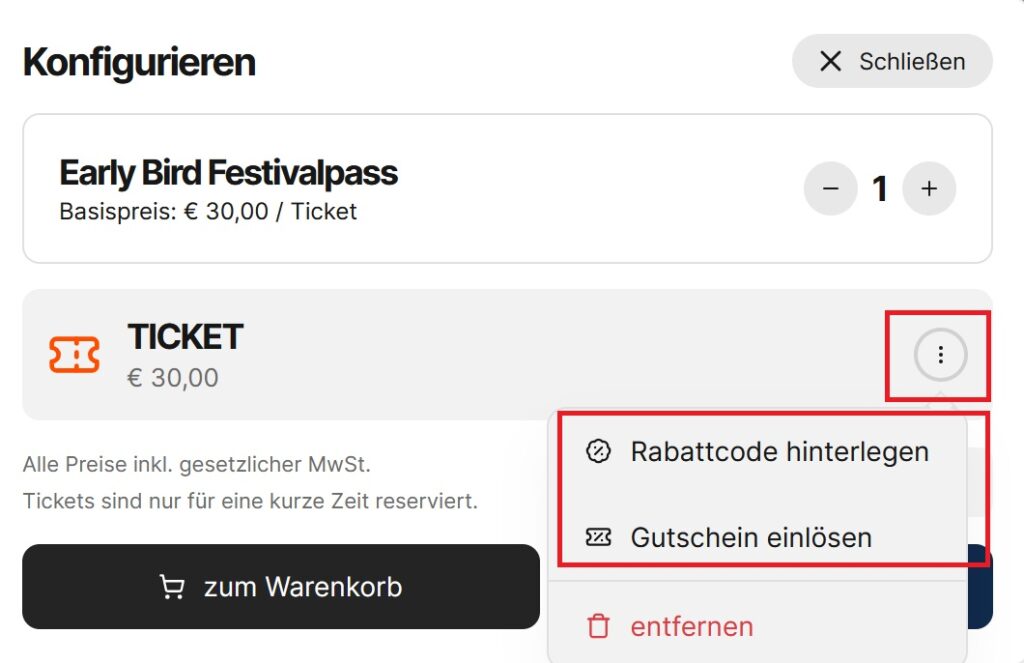
2) If the tickets are to be personalized or a discount needs to be selected, you can configure this in the next step:
3) Once you select “to cart”, you can start the payment process in the top right corner:
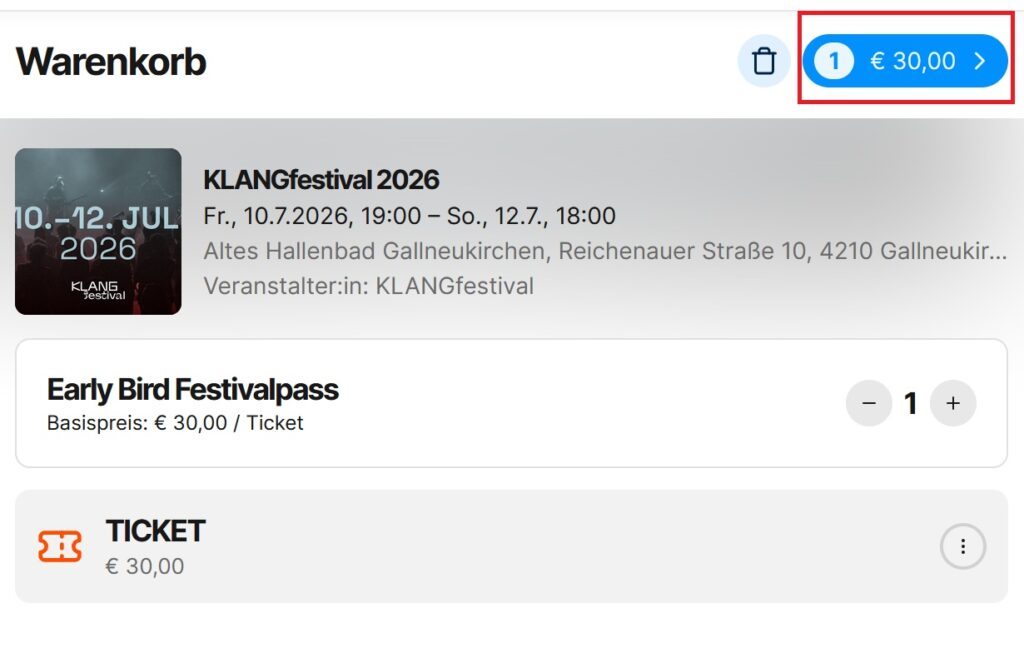
4) Now you can choose whether payment is made in cash or by card – you can also book reservations or free tickets here.
5) After successful payment, the tickets and the invoice are printed automatically on the printer provided.
Point of sale – add a register and card terminal
To accept card payments via the POS as well, you need to add a Stripe terminal in the POS settings. To do so, go to “Shop configuration” in the main menu and select “Point of sale”.
1) Configure the point of sale
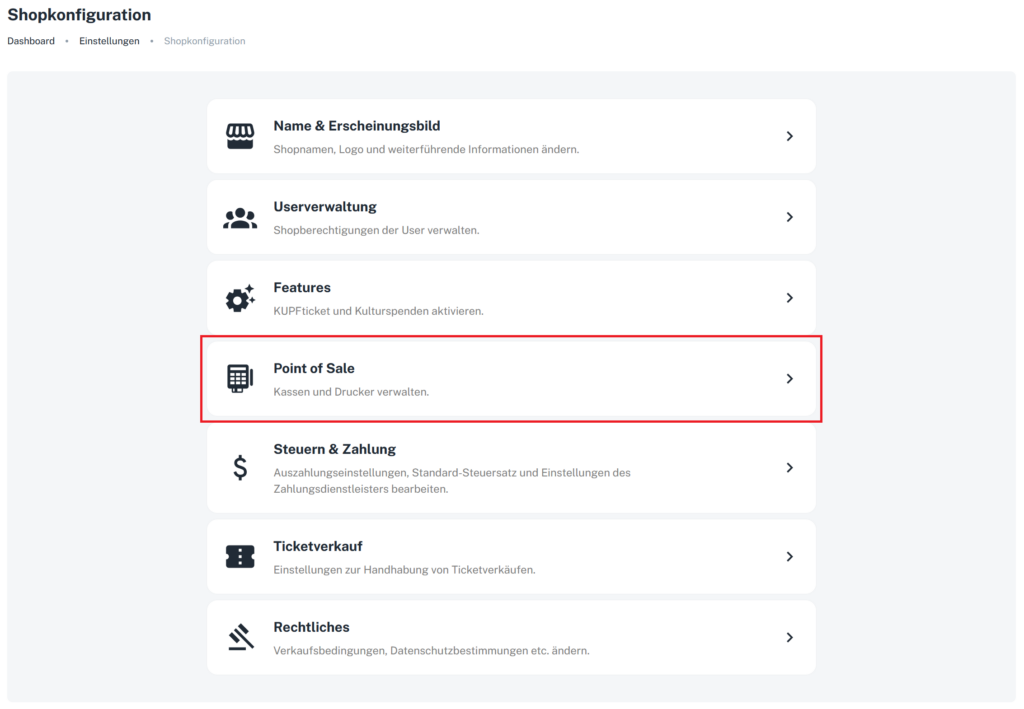
2) Add a register

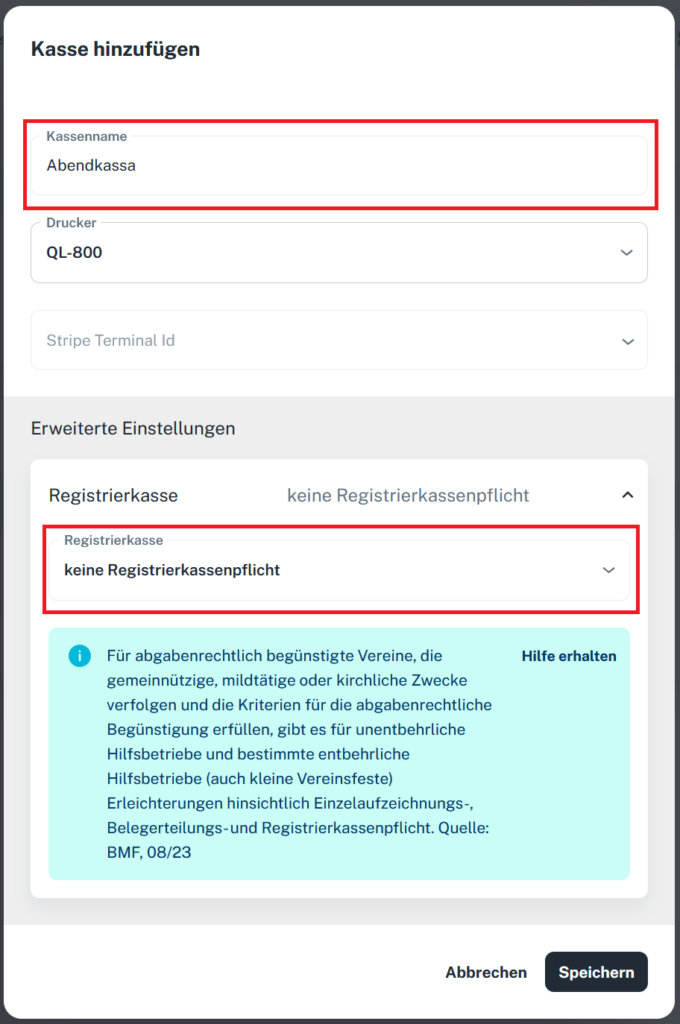
3) Add a Stripe terminal
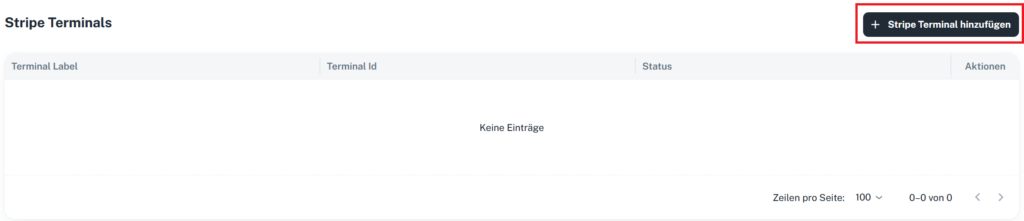
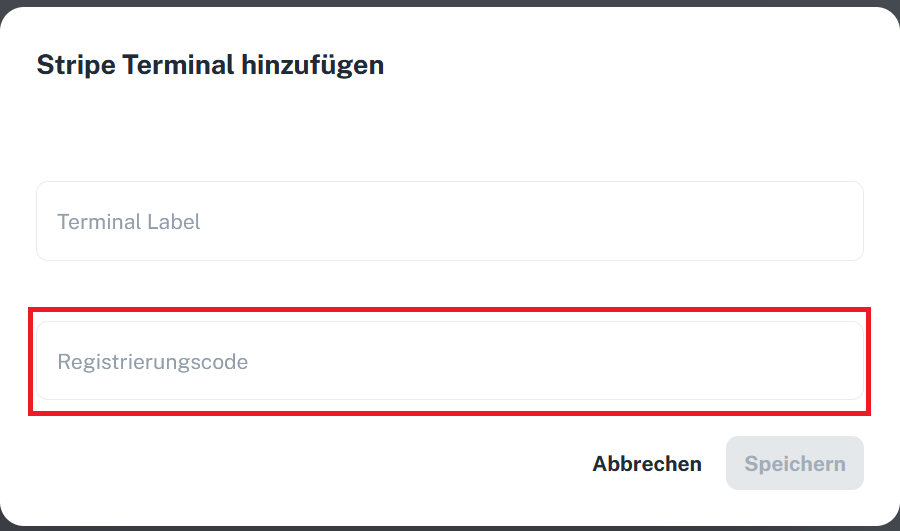
Now switch on the card terminal, connect it to a Wi-Fi network and wait until the registration code appears.
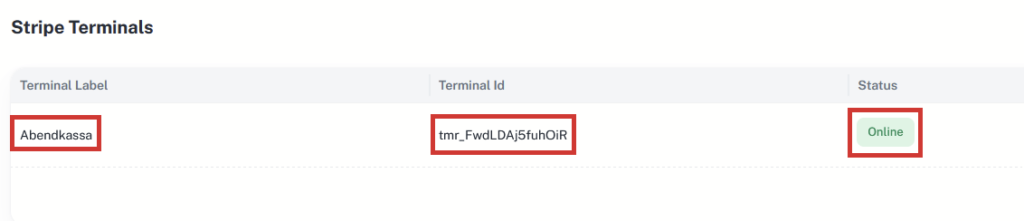
You can tell whether the terminal is connected to the shop by the status “Online”. Now the Stripe terminal just needs to be linked to the register.
4) Link register and terminal

Open the register’s edit mode by clicking the three dots and then “Edit”.
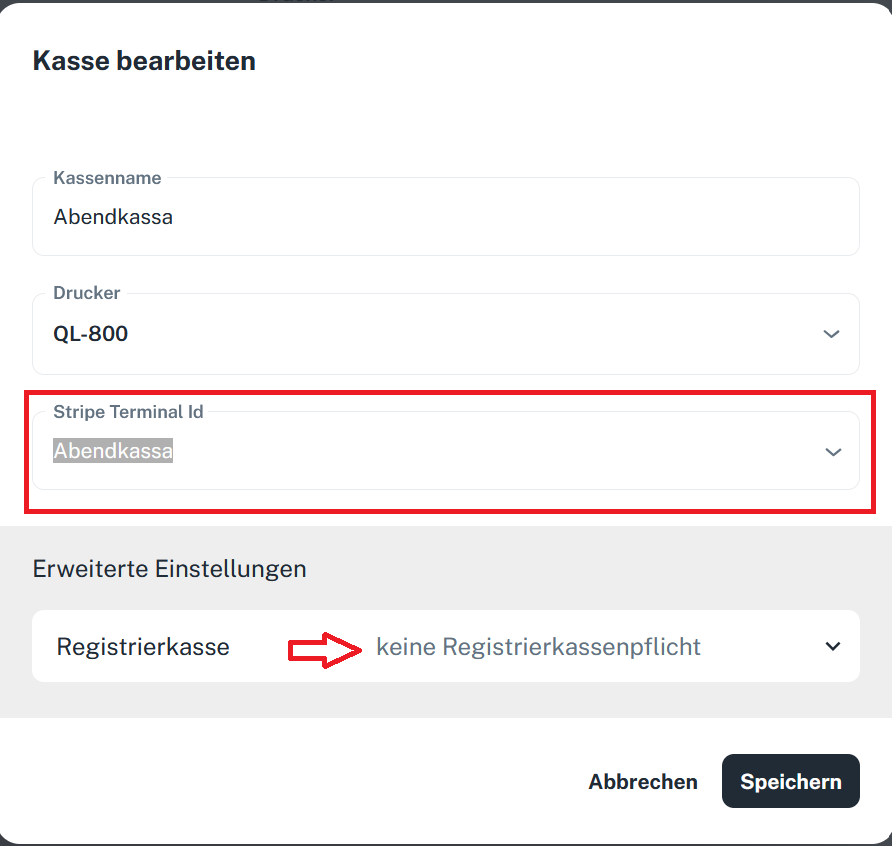
Now select the Stripe terminal you created earlier from the dropdown menu.
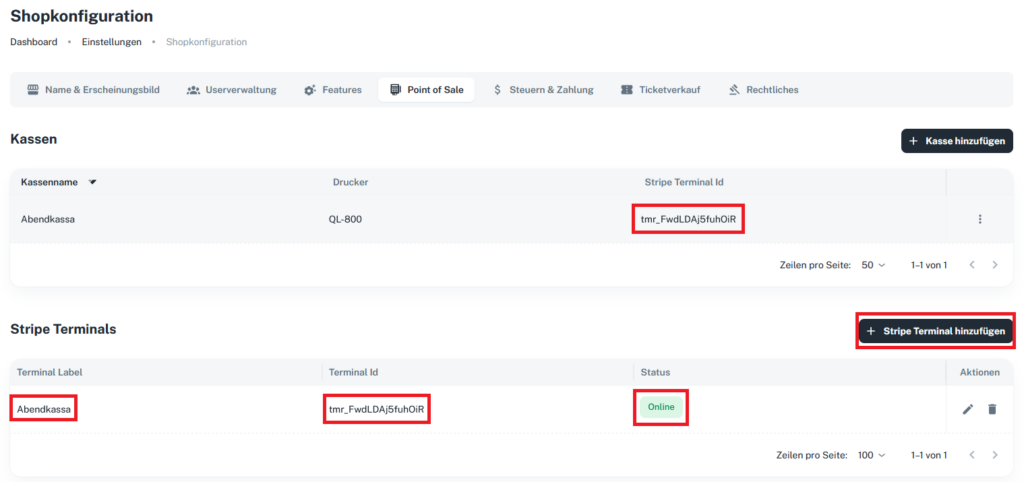
Once all settings have been made, the linked Stripe terminal appears next to the register.
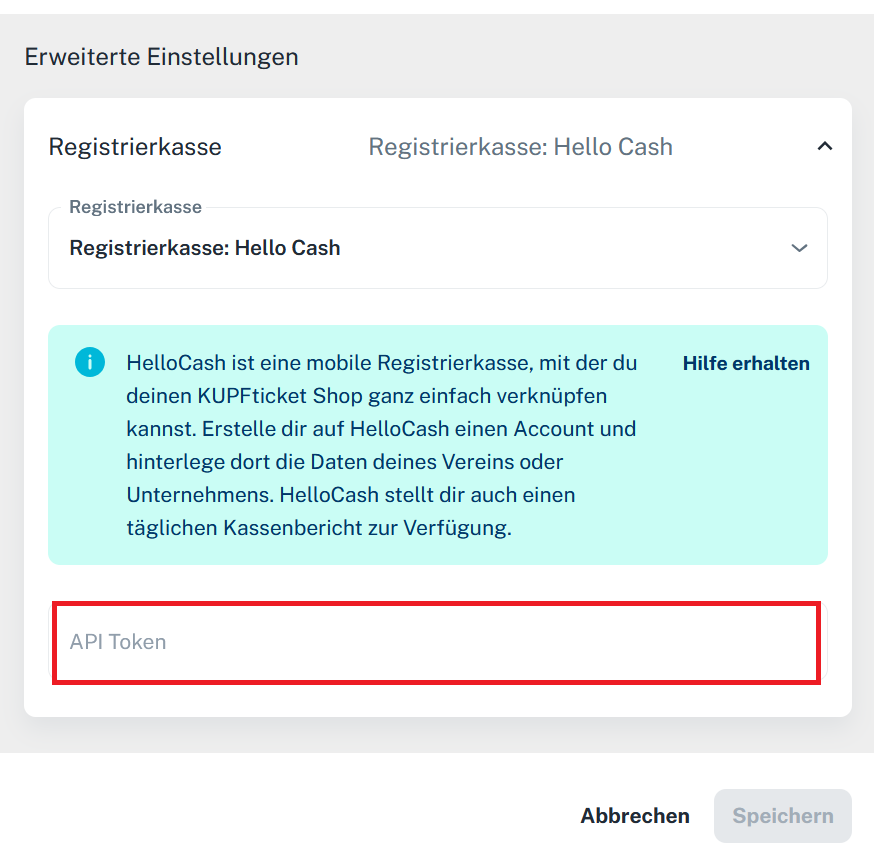
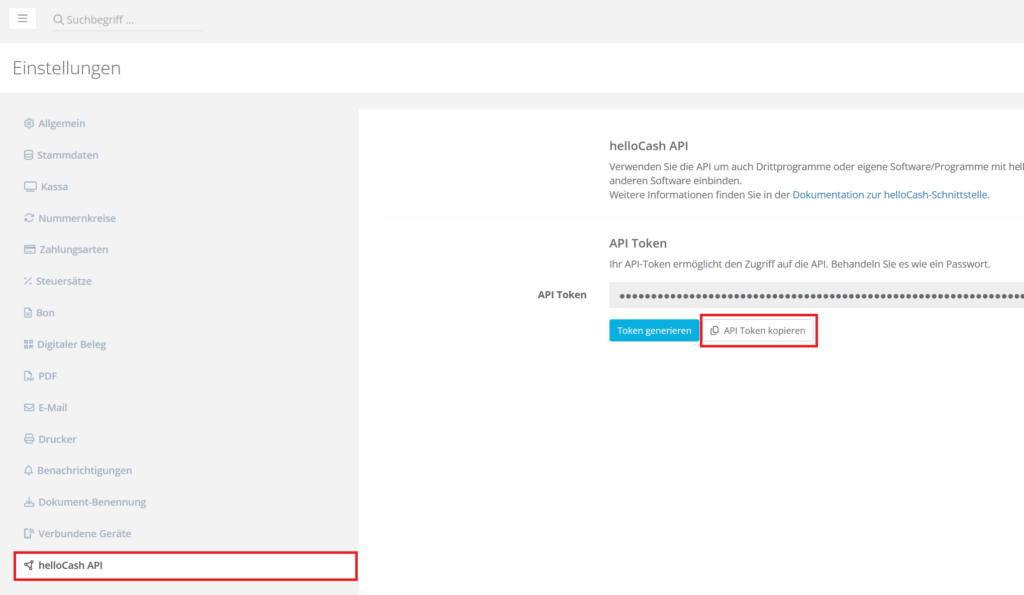
If you need a cash register integration, you can set this up in the register’s edit mode:
Scan & Kassa-App Download
Den Downlaod findest du in den gängigen App-Stores von google und Apple. Oder direkt in deinem Admin-Bereich unter “Apps“.
Jetzt downloaden!


Point of Sale – Allgemeine Info
Wenn du vor Ort Tickets verkaufen möchtest, kannst du entweder unsere kostenlose App nutzen oder unseren Ticketdrucker samt Kartenterminal kaufen oder mieten.
1) Im Point of Sale (PoS) kannst du jederzeit Tickets einbuchen, Reservierungen erstellen oder Freikarten ausstellen.
2) Für den Ticketdruck stellen wir einen Drucker zur Verfügung. Der Ticketdruck ist derzeit nur über den Browser möglich, jedoch nicht über die App. Wir empfehlen die Verwendung von Chrome.
3) Für die Abwicklung von Kartenzahlungen stellen wir dir gerne ein brandneues Stripe-Terminal zur Verfügung.
4) Das Point of Sale kannst du direkt über den Adminbereich öffnen.
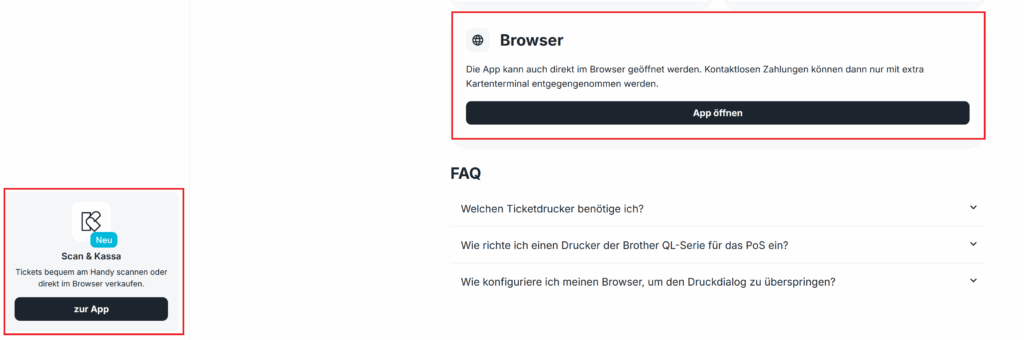
Hinweis: Mit unserer modernen App kannst du Tickets via “Tap-to-Pay” direkt mit dem Smartphone verkaufen.
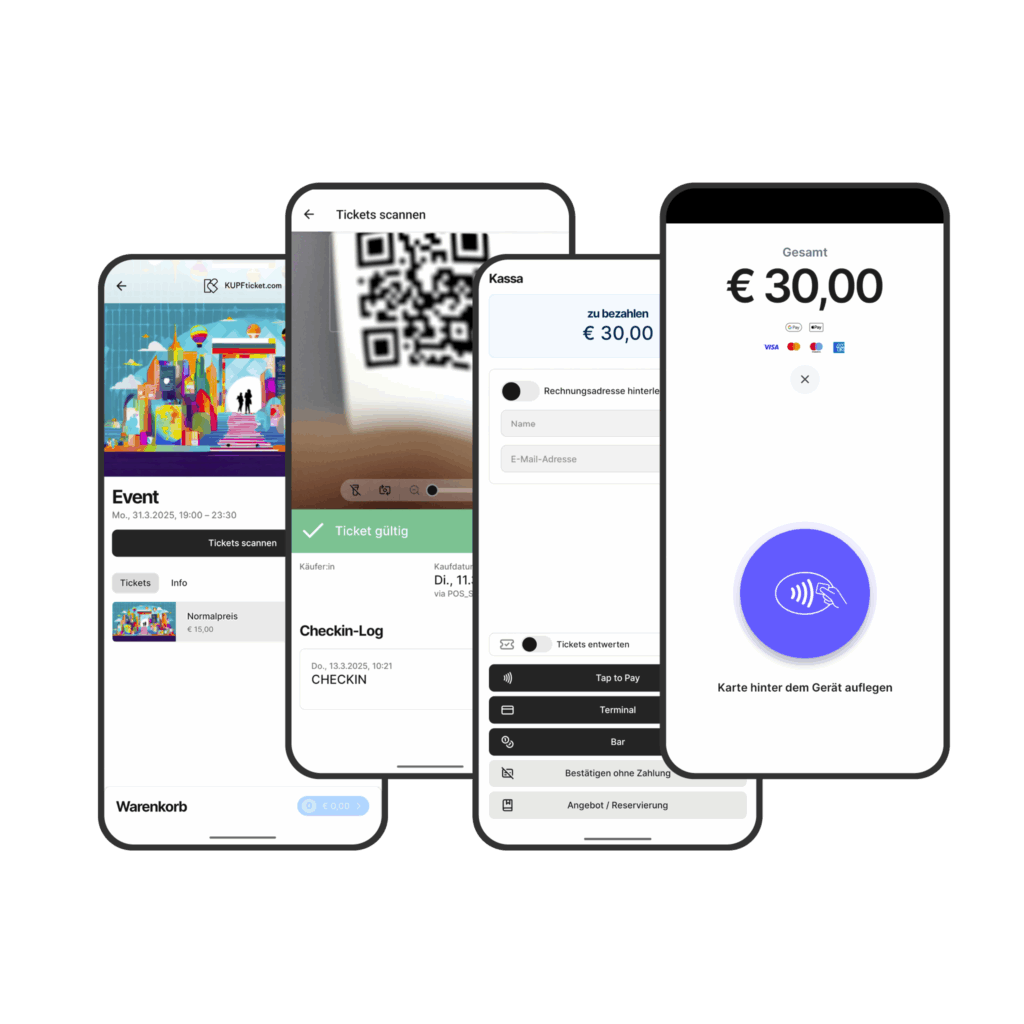
Alle weiteren Einstellungen findest du in den jeweiligen Einträgen in unseren FAQs.
Scan & Kassa-App Login
Melde dich ganz einfach mit deinen Zugangsdaten von KUPFticket.com in der Scan-App an.
Sobald du eingeloggt bist, erhältst du Zugriff auf deinen Shop und kannst Tickets direkt über die App verkaufen oder die QR-Codes auf digitalen oder ausgedruckten Tickets (PDF) scannen.
Hilfe & Support
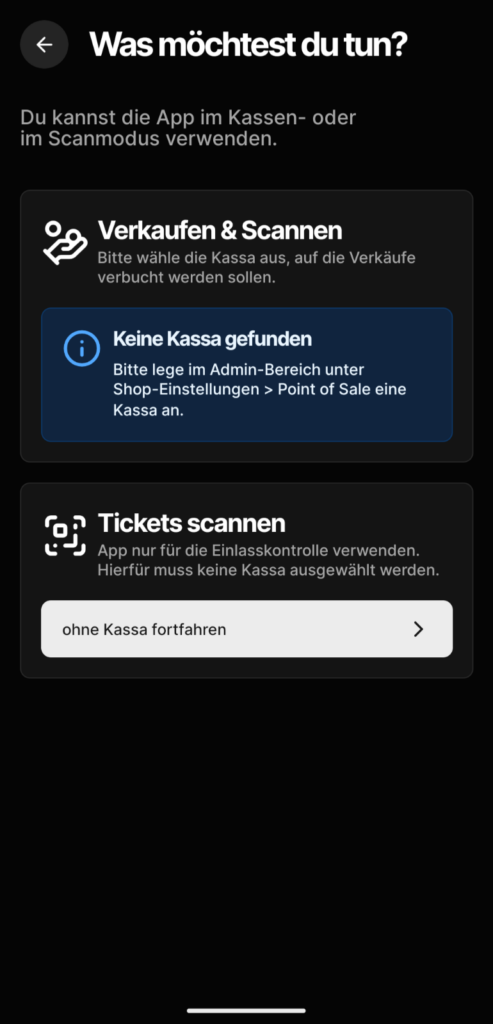
Register not found
Important: don’t forget to add a register: If you haven’t used the point of sale yet, you still need to add a register. See “Point of sale: add a register”
Service hotline for shop operators
Our service hotline is for shop operators only.
Mon–Fri, 9:00 a.m. to 4:00 p.m.
+43 732 79 42 88 90
Ticket orders and customer service are not handled via this number. Please contact the organizer directly.
Stripe hat meinen Shop gesperrt
Stripe kann im Rahmen der Verifizierung zusätzliche Dokumente von dir anfordern. Das ist ein normaler Bestandteil des Verifizierungsprozesses und dient dazu, die bei Stripe hinterlegten Angaben zu überprüfen.
Je nachdem, welche Angaben überprüft werden müssen, kann Stripe unterschiedliche Dokumente anfordern:
Unternehmensnachweis
- ZVR-Auszug (bei Vereinen)
- Firmenbuchauszug
- Spendenbegünstigungsbescheid
- Mehrwertsteuerregistrierung
Identitätsnachweis
- Reisepass
- Führerschein
Nachweis der Privatadresse
- Meldezettel bzw. Bestätigung der Meldung, innerhalb der letzten 12 Monate ausgestellt
- Strom- oder Gasrechnung, innerhalb der letzten 6 Monate ausgestellt
- Kontoauszug, innerhalb der letzten 6 Monate ausgestellt
- Jahresabschluss
Welches Dokument du hochladen musst, hängt von der jeweiligen Verifizierungsanfrage von Stripe ab. Bitte lade nur das von Stripe angeforderte Dokument hoch und achte darauf, dass es vollständig und gut lesbar ist.
Eine vollständige Übersicht der von Stripe akzeptierten Dokumente findest du in der Dokumentation von Stripe.
Wichtig für Vereine
Wenn ihr einen Verein bzw. eine gemeinnützige Organisation vertretet, achtet bei der Einrichtung eures Stripe-Kontos besonders darauf, die Angaben korrekt zu hinterlegen. Wählt keine zusätzlichen Rollen wie „Vorstand“, „Inhaber“, „Direktor“ oder ähnliche Unternehmensrollen aus, wenn diese auf euren Verein nicht zutreffen. Dadurch kann der Verein bei Stripe fälschlicherweise als klassisches Unternehmen eingestuft werden. In diesem Fall kann es passieren, dass der ZVR-Auszug nicht mehr als Unternehmensnachweis akzeptiert wird und Stripe zusätzliche Unterlagen anfordert.
Ausfüllhilfe für Vereine
Wir haben deshalb eine eigene Ausfüllhilfe zur Shoperstellung für Vereine erstellt. Bitte verwendet diese bei der Einrichtung eures Shops und insbesondere bei der Stripe-Verifizierung. Im Manual ist Schritt für Schritt erklärt, welche Angaben Vereine machen müssen und welche Unternehmensrollen bei Stripe nicht angegeben werden sollen.
Wenn Stripe ein Dokument von euch benötigt, findet ihr die Aufforderung direkt in eurem Stripe-Konto. Öffnet dazu in den Shop-Einstellungen den Bereich „Steuern & Zahlung“ und meldet euch bei Stripe an.
Gutschein
Enable voucher sales
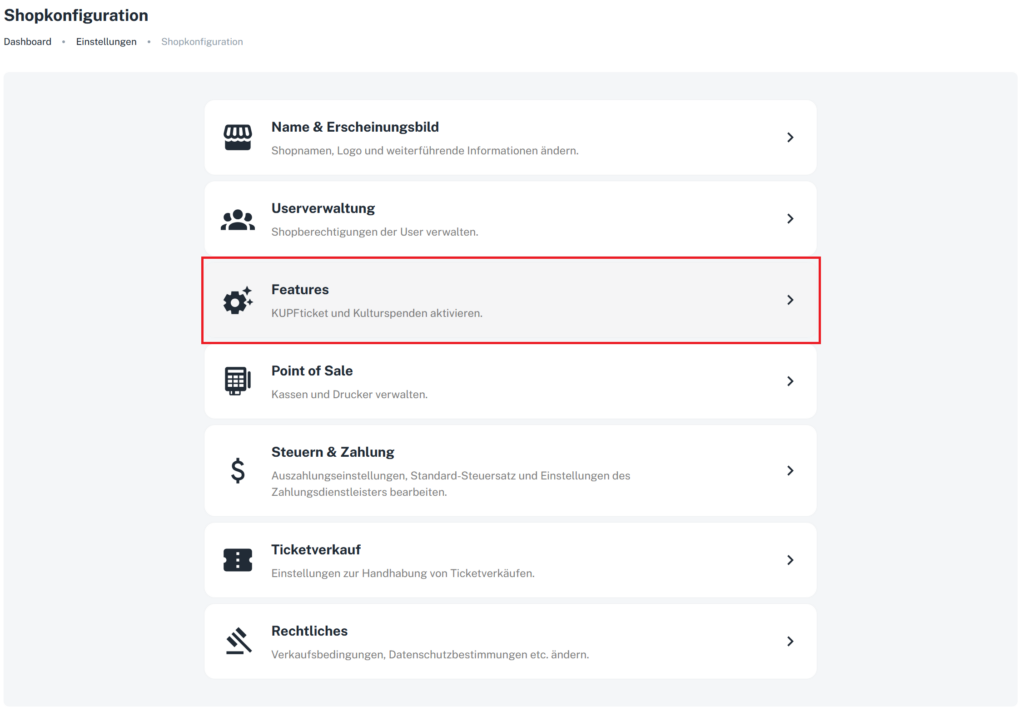
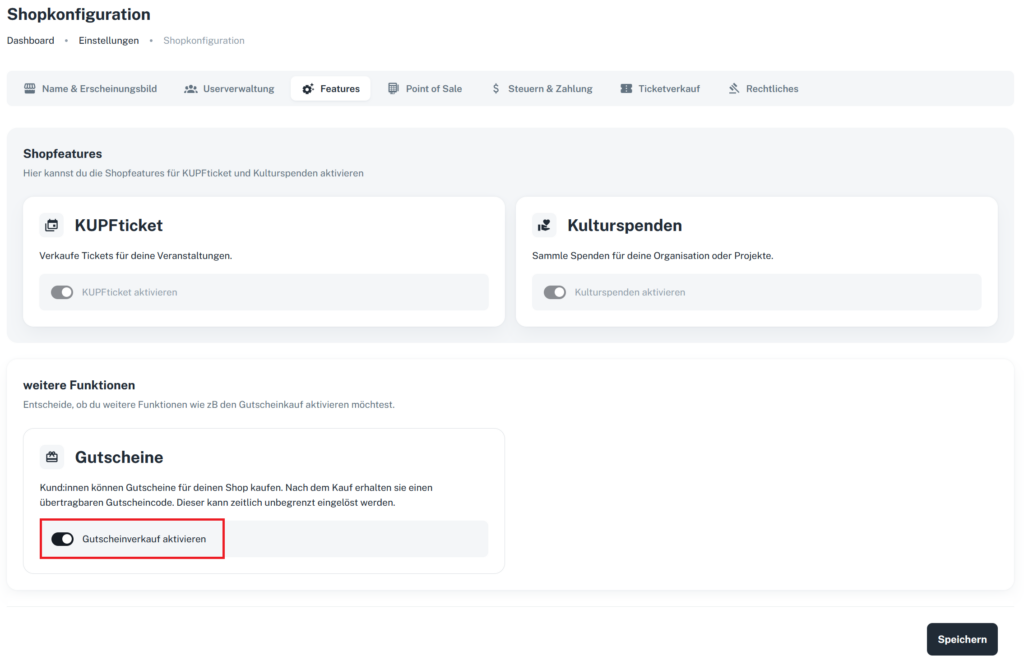
To activate voucher sales, you need to enable the feature under Shop configuration.
1) Open Features in the shop configuration:
2) Select “Enable voucher sales”
3) The option “Buy voucher” is now displayed in the web shop
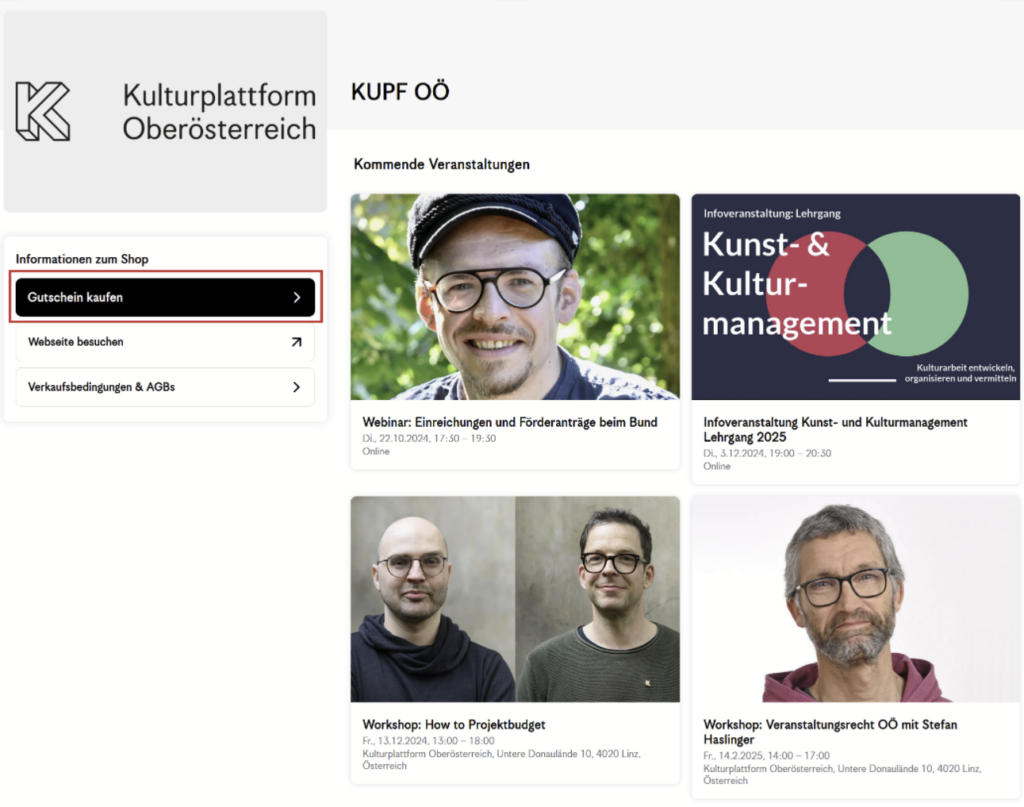
kulturspenden
kulturspenden – donation receipt
Your donors automatically receive a confirmation email from us with the donation receipt for the full amount donated to you.
kulturspenden – payouts
Payouts are made automatically once a month.
You receive the invoice by email, and it can be downloaded from your admin area at any time.
kulturspenden – fee overview
Online and POS via card terminal:
Donations: 3.7% of the gross amount + €0.20 + VAT
Minimum fee:
Donations: €0.30 + VAT
Minimum donation:
€1.00
See:
https://kupfservices.com/en/pricing/
kulturspenden – buttons & banners





kulturspenden – statutes checked yet?
Since January 1, 2024, tax-deductible donation status has been open to all non-profit associations, including cultural associations. Donations to a non-profit cultural association can now be deducted from taxes. An important criterion for obtaining this status is the association’s statutes. Do your statutes meet the necessary requirements regarding non-profit status? Here is a checklist.
All information (in German):
https://igkultur.at/praxis/spendenbeguenstigung-statuten-schon-gecheckt
kulturspenden – FAQs of the tax office
Here you can find all the necessary information compiled by the Austrian tax office (in German):
https://www.bmf.gv.at/themen/steuern/spenden-gemeinnuetzigkeit/spendenbeguenstigung-neu.html
kulturspenden – tax-deductible donations since 1 Jan 2024
Note on the new tax-deductible donation status:
Since January 1, 2024, all non-profit organizations can opt into the list of donation-beneficiary organizations.
The tax office has compiled a clear FAQ on this (in German).
kulturspenden.at supports you with the required reporting of donations to the tax office. We’re happy to help if you have questions.
kulturspenden – create a donation campaign
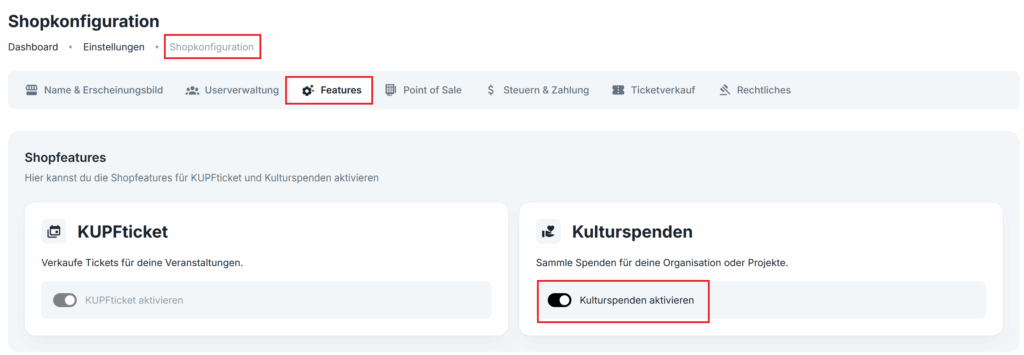
Step 1: Enable Kulturspenden
Under “Shop configuration” -> “Features“, you can enable the “Kulturspenden” feature at any time:
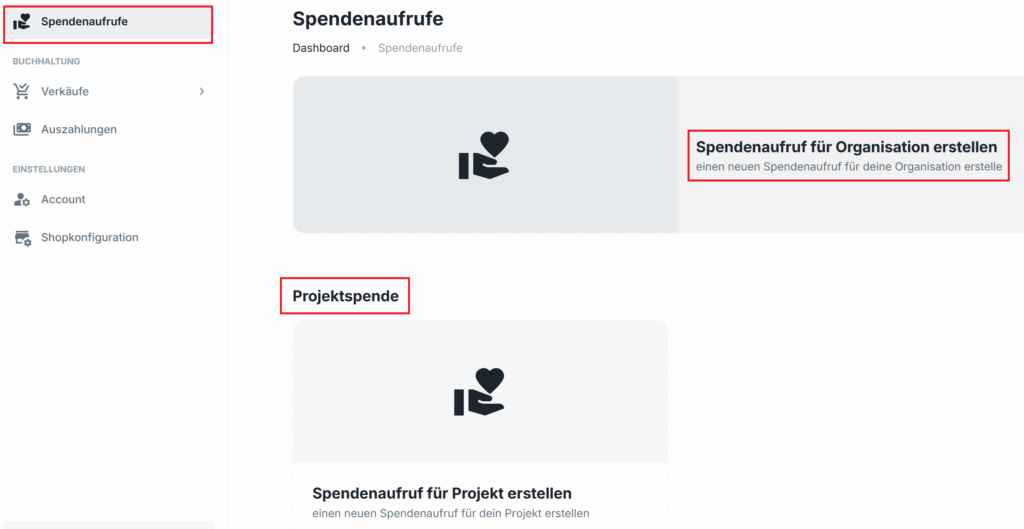
Step 2: Create a donation campaign
Now, under “Donation campaigns“, you can create a donation campaign for your organization or start a crowdfunding campaign (project donation) at any time:
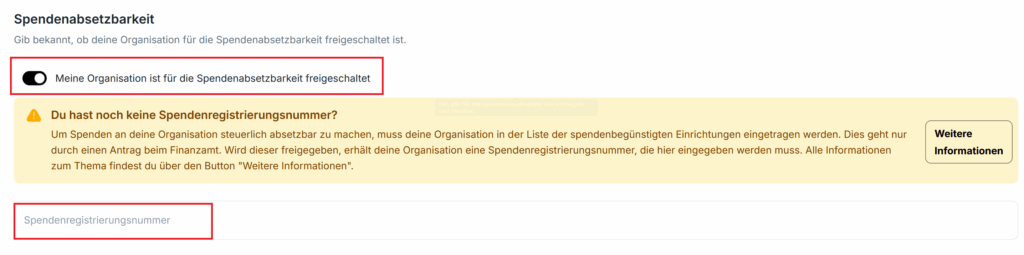
(optional) Step 3: Enable tax deductibility of donations
Under “Shop configuration” -> “Taxes & payment“, you can optionally enable tax deductibility if your organization is on the list of donation-beneficiary organizations.
The donation registration number uses the following format: KK–1234 -> don’t forget the hyphen. It is sometimes missing in the authority’s notice.
Sitzpläne
Seating charts – block individual seats
Once you have published your reserved-seating event, you can block individual seats directly within the event in the admin area:
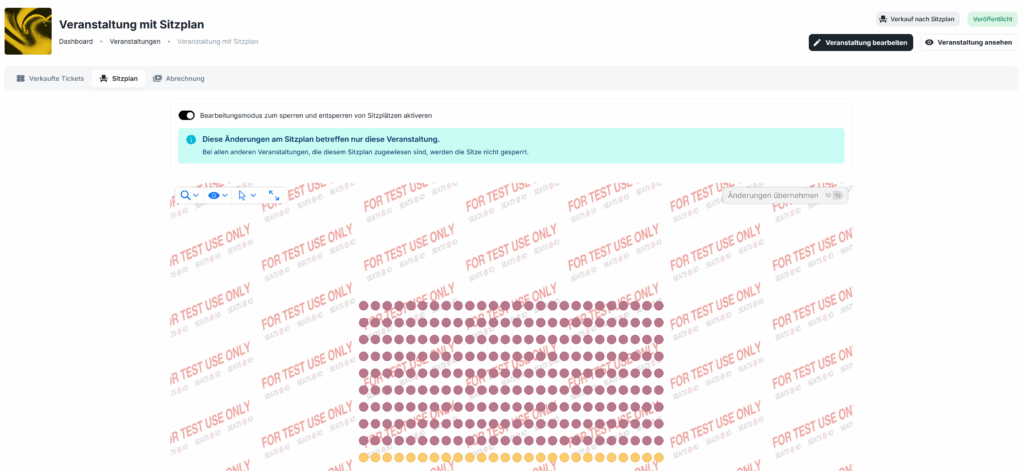
In the “Seating chart” tab, you can block individual seats. Blocked seats can be unblocked again at any time.
Seating charts – create
Under “Events” -> “Seating charts”, you’ll find the button “Create seating chart”.

In the next step, choose the option “Simple” – unless you want to create a particularly detailed seating chart.
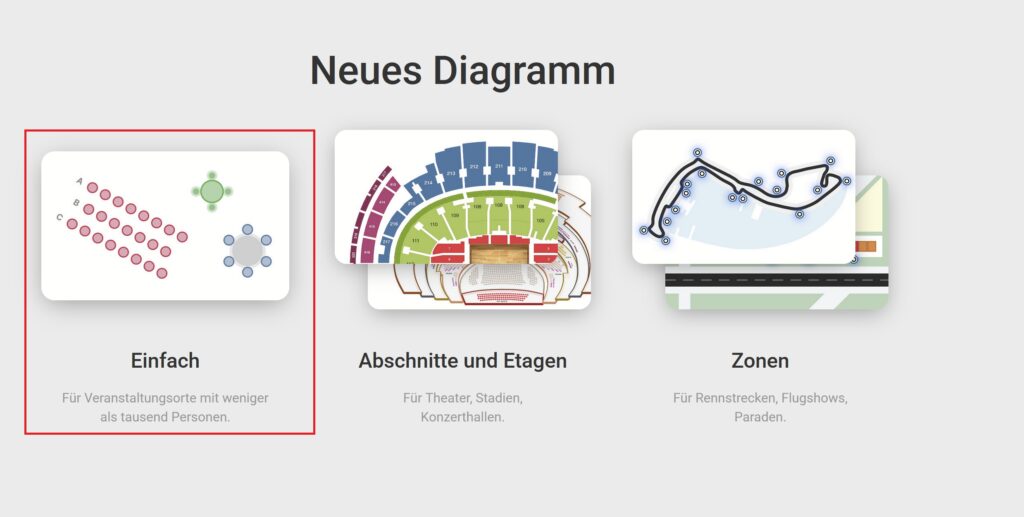
If you need help creating your seating chart, feel free to email us at: [email protected]